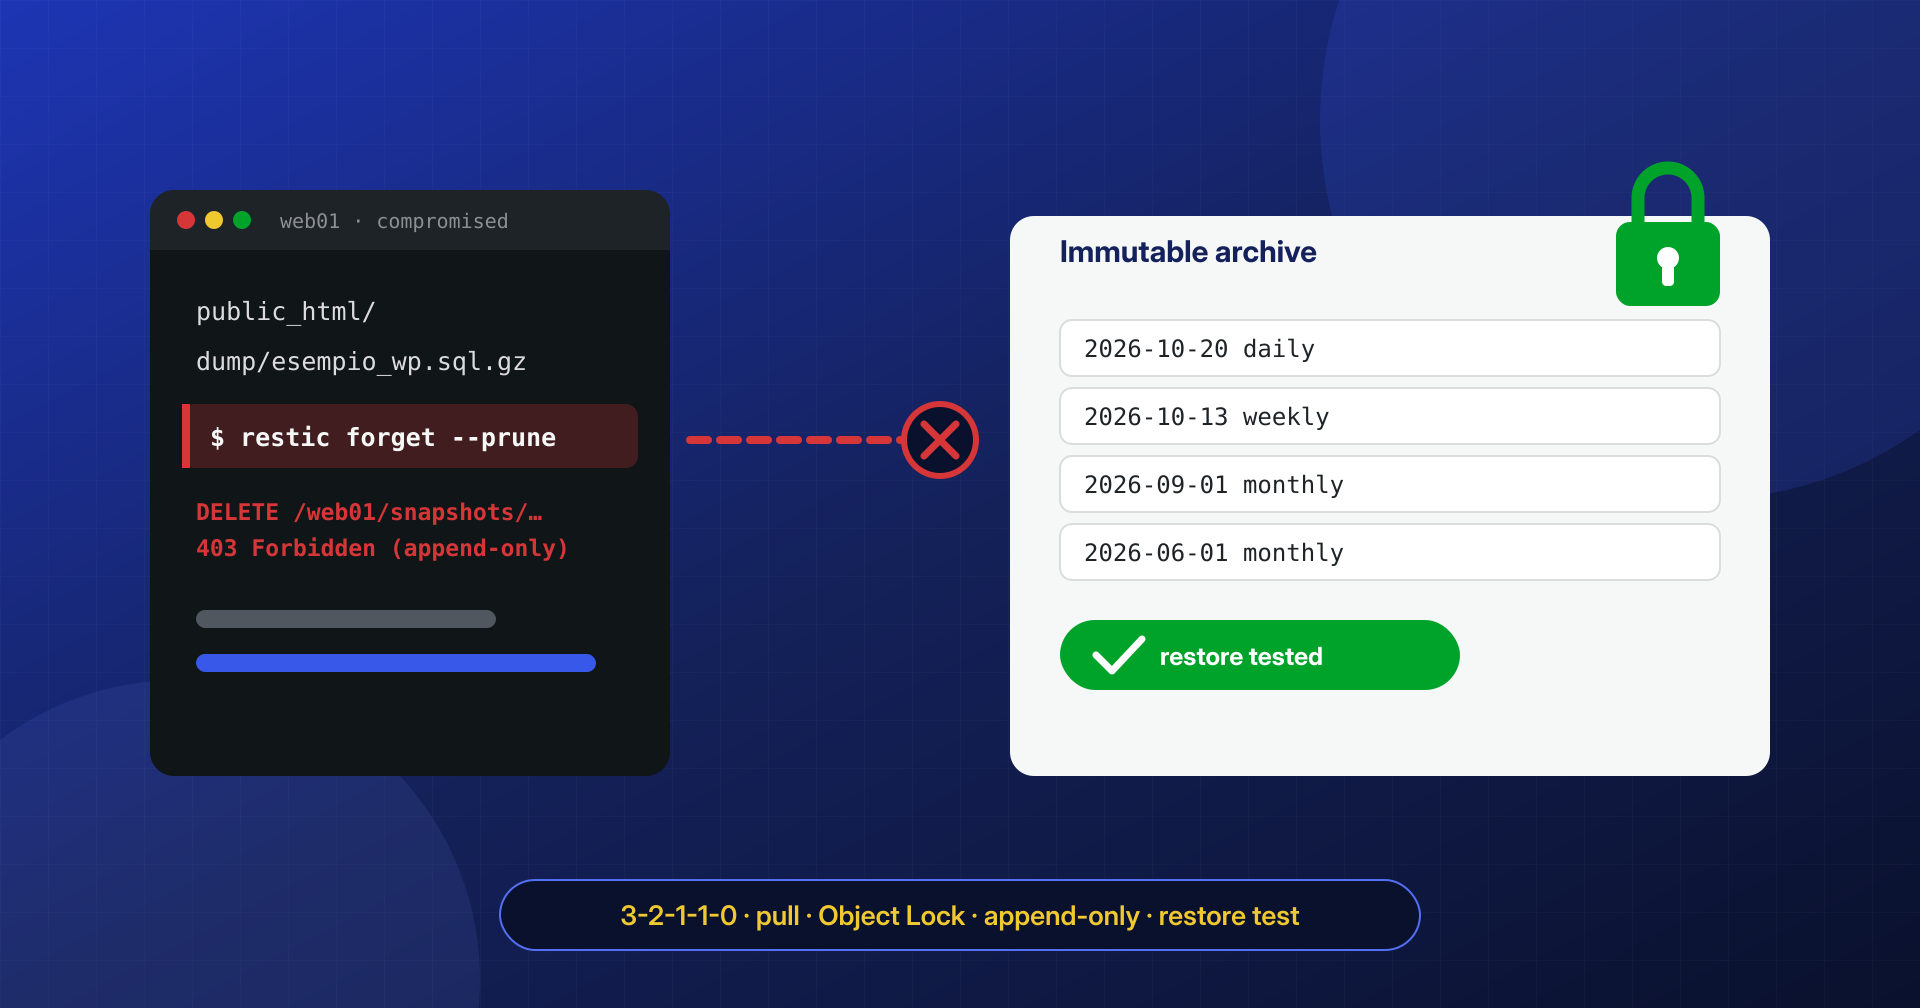
Almost every site has a backup. Far fewer have a backup that survives an attacker. The difference shows up at the worst moment: the site is encrypted or wiped, you open the backup plugin’s panel and the copies are gone, or they are there but contain the same backdoor that caused the disaster, or the database file stops halfway through a table. A backup that has never passed a restore test is a hope, not a guarantee.
A backup is ransomware-proof when whoever controls the site’s server can neither delete nor modify it, when it goes back far enough in time to predate the infection, and when someone has verified that it really restores.
In this article we look at how to build copies with these three properties: immutable, off-site and verified. We don’t cover how to choose the backup to restart from after an infection, or the reasons why a restore can bring the malware back, which we dealt with in the article on backups that aren’t enough to eliminate malware: here we deal with how backups must be made beforehand, so that they are still there when needed.
Why backups are the first target
Whoever encrypts a site or deletes its database to demand a ransom knows that the owner, if they have a recent copy, won’t pay. That is why, when they can, they destroy the copies first. And on a typical WordPress site they almost always can, because backups sit in one of three places reachable with the same privileges used to compromise the site.
The first is the same server, often the same folder: archives in wp-content/backups or in a subfolder of the backup plugin belong to the PHP user and can be deleted with one line of code, when they aren’t even downloadable from the web, as we describe in the article on exposed files. The second is remote storage where the site pushes the copies: an FTP server, a bucket, a cloud service. The credentials to write there are saved in the site’s database or in a configuration file, so whoever has the site also has the archive’s keys, and if those keys allow writing they usually allow deleting too. The third is a disk in the same hosting account, or a snapshot managed from a panel accessed with a reused password.
The design rule that follows is simple to state: the system that produces the data must not have the power to destroy the copies. The rest of the article is a way of putting it into practice.
The 3-2-1 rule and its extensions
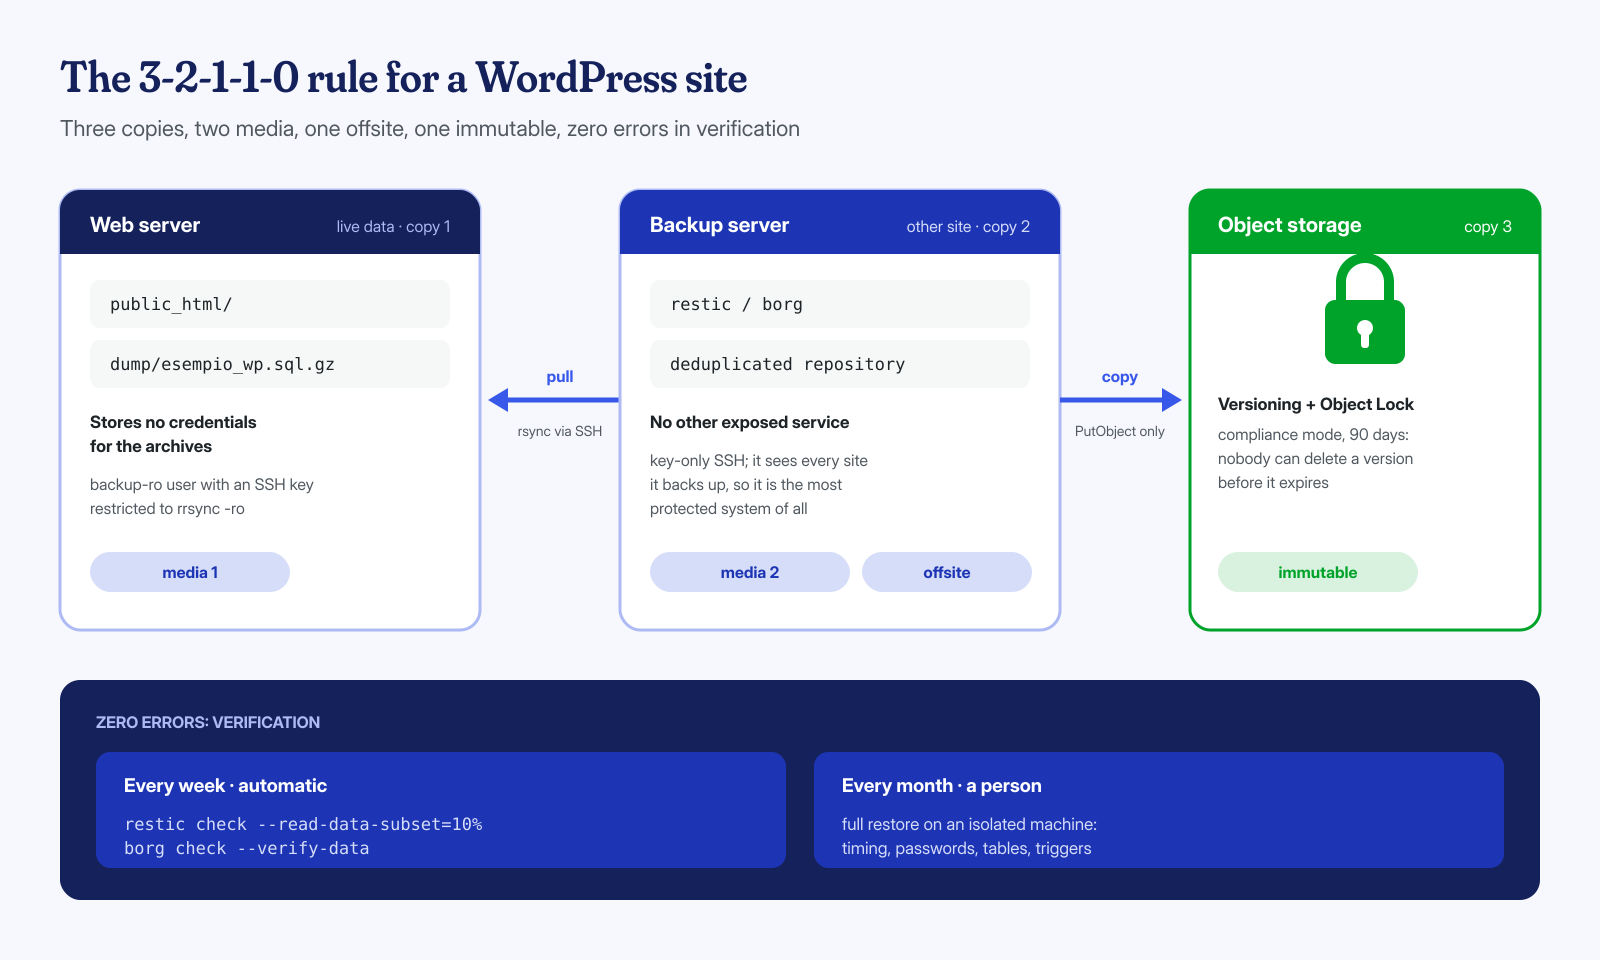
The classic formula is 3-2-1: three copies of the data, on two different media, one of them off-site. It is a good starting point, but it was born for failures, fires and accidental deletions, not for an adversary acting on purpose. That is why an extended version, 3-2-1-1-0, has spread, adding two requirements: at least one offline or immutable copy, meaning one that can’t be modified even by someone with valid credentials, and zero errors in periodic restore tests.
Applied to a WordPress site on a Linux server, the formula translates like this: the live data on the server; one copy on a second backup server, in another location, which pulls it by itself; one copy on object storage with object locking, which nobody can delete before expiry; an automatic check that verifies the archives, and a test restore performed by a person at regular intervals. You don’t need big-company infrastructure: a small VPS in another data center and a bucket with Object Lock are enough for most sites.
Push or pull: who holds the keys
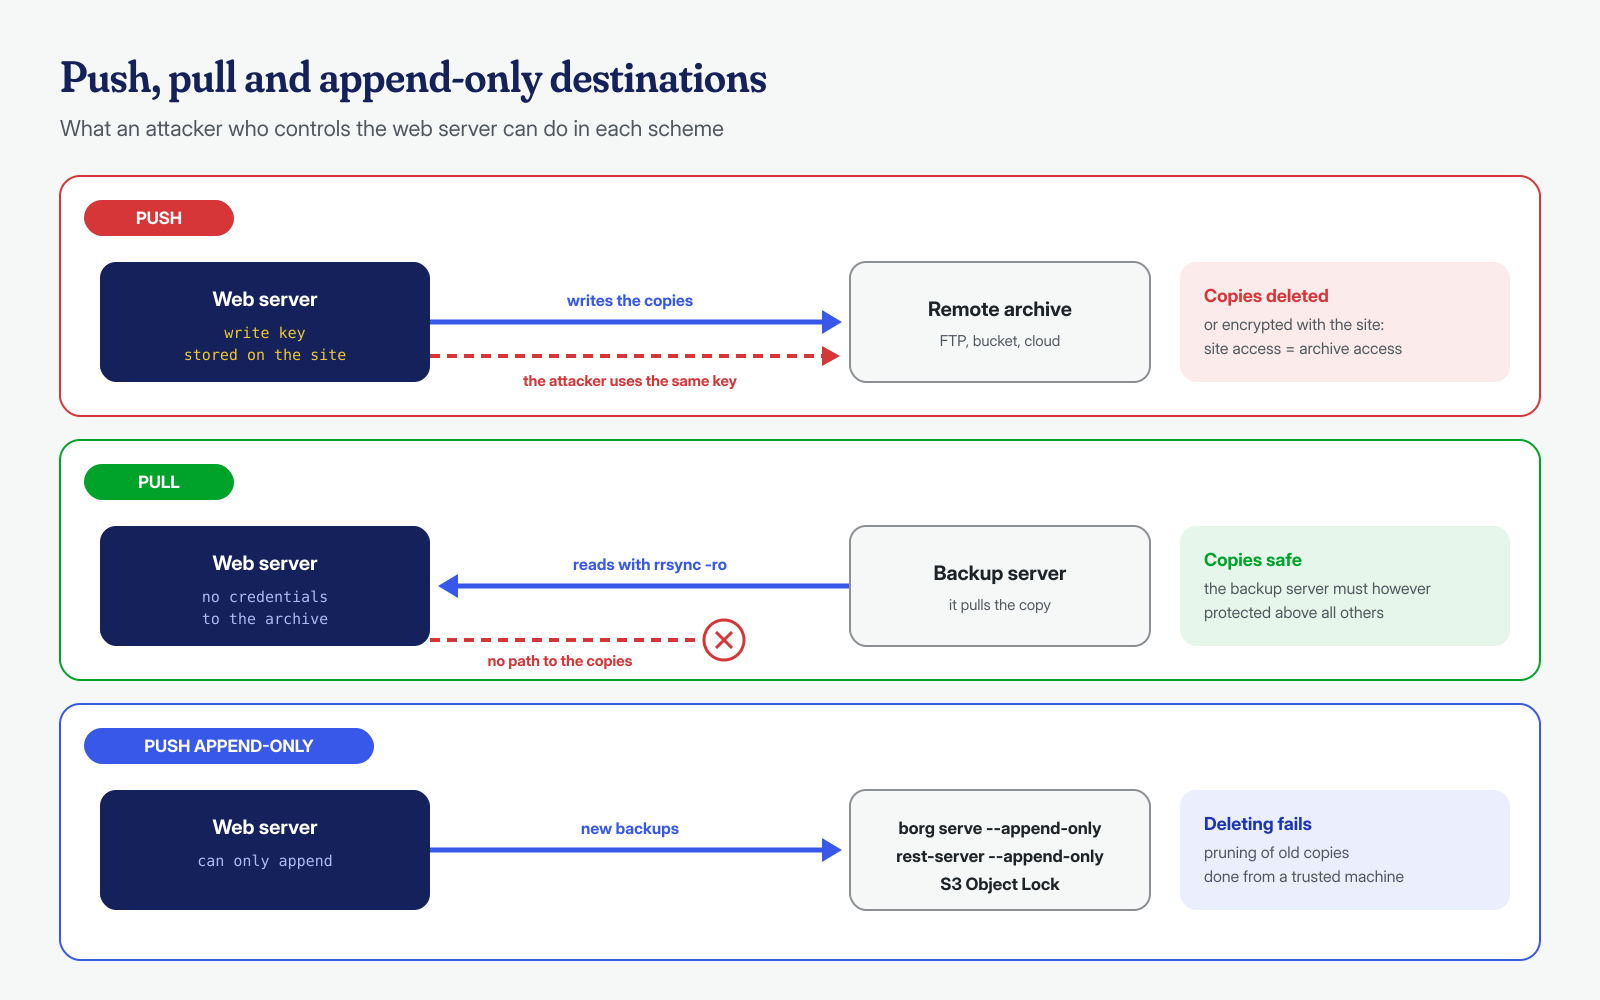
In a push backup, the site’s server connects to the destination and writes to it. This is the scheme of backup plugins and many scripts: convenient, but the server has to keep write credentials for the destination. In a pull backup, the backup server connects to the site’s server, reads the data and takes it away. The site’s server doesn’t even know the archive’s address, and if it is compromised the attacker finds nothing to use to reach it.
Pull is implemented with standard tools. On the site’s server you create a dedicated user, with an SSH key restricted by the authorized_keys file to a single command, read-only rrsync, shipped with rsync (the path varies from one distribution to another). The backup server launches the copy on a schedule:
# On the web server, in ~backup-ro/.ssh/authorized_keys (a single line)
command="/usr/bin/rrsync -ro /var/www/esempio.it",restrict ssh-ed25519 AAAAC3Nz... pull@backup01

# On the backup server, from cron: the copy is pulled, not pushed
rsync -aH --delete --numeric-ids -e "ssh -i /root/.ssh/pull_web01" \
  backup-ro@web01.esempio.it:/ /srv/staging/esempio.it/
Pull has a limit worth knowing: if the backup server is compromised, it has read access to all the sites it saves. It must therefore be treated as the most protected system in the infrastructure: no exposed services other than SSH, key-only access, no other duties. When pull isn’t possible, for example on shared hosting without SSH, push remains acceptable on one condition: that the credentials saved on the site only allow adding data, and never deleting it. That is what the next two techniques do.
Object storage with versioning and Object Lock
S3-compatible object storage offers a true immutability mechanism, enforced by the provider and not by the client. According to the Amazon S3 Object Lock documentation, the lock follows a write once, read many model, works only on buckets with versioning enabled and has two modes. In governance mode, users with a special permission can still remove the lock; in compliance mode nobody can overwrite or delete a protected version before expiry, not even the account’s root user, and the period cannot be shortened.
# Bucket with Object Lock (must be enabled at creation) and a default retention of 90 days
aws s3api create-bucket --bucket esempio-backup --region eu-south-1 \
  --create-bucket-configuration LocationConstraint=eu-south-1 \
  --object-lock-enabled-for-bucket

aws s3api put-object-lock-configuration --bucket esempio-backup \
  --object-lock-configuration '{"ObjectLockEnabled":"Enabled","Rule":{"DefaultRetention":{"Mode":"COMPLIANCE","Days":90}}}'
Two details make the difference. The first: a delete without a version number doesn’t fail, but adds a delete marker that hides the object; the locked version remains and can be recovered. Whoever checks the bucket from the console will see the object “gone” and must know where to look. The second: the credentials the server uses to upload backups must have only write permission, with no permission to delete versions or bypass governance. Compliance mode should be chosen deliberately, because even a mistake stays there until expiry and you pay for the space it occupies; to start, you can try the configuration in governance mode and switch to compliance when it is stable.
restic and borg in append-only mode
The two most widely used deduplicating backup tools on Linux both have a mode in which the client can add new backups but cannot delete existing ones. For borg, the documentation describes the --append-only option of borg serve, to be enforced on the backup server in the client’s SSH key line: a compromised client can add archives but cannot permanently delete those already written. For restic, the same result is achieved with rest-server started with --append-only, optionally with --private-repos so each user sees only their own repository.
# borg — on the backup server, in ~borg/.ssh/authorized_keys (a single line)
command="borg serve --append-only --restrict-to-path /srv/borg/web01",restrict ssh-ed25519 AAAAC3Nz... root@web01

# borg — on the web server
borg create --stats ssh://borg@backup01.esempio.it/srv/borg/web01::'{hostname}-{now}' \
  /var/www/esempio.it

# restic — REST server that only accepts additions
rest-server --path /srv/restic --append-only --private-repos

# restic — on the web server (repository password in a file readable only by root)
restic -r rest:https://web01:PASSWORD@backup01.esempio.it:8000/web01/ \
  --password-file /root/.restic-pass backup /var/www/esempio.it
The practical consequence is that pruning old copies, restic forget --prune or borg prune and borg compact, can no longer be done from the web server: it must be run from a trusted admin machine with full access to the repository. The borg documentation points out a pitfall: a write operation performed without append-only, such as a prune launched from that machine, makes permanent even the deletions previously attempted by a compromised client. Before any maintenance it is therefore wise to check the list of archives and look for gaps or unexpected deletions.
A consistent, complete database dump
Copying MySQL’s files while the server is running almost always produces an unusable backup. The WordPress database must be exported with mysqldump (or mariadb-dump on recent MariaDB versions), with the right options. With --single-transaction the export happens inside a transaction and takes a consistent snapshot of the InnoDB tables without locking them, as the MySQL documentation explains; it does not, however, protect against structure changes made during the dump, so updates and dumps should not overlap.
#!/bin/bash
# /usr/local/bin/dump-esempio.sh — credentials in /root/.my.cnf (chmod 600)
# The dump sits outside the public_html docroot but inside the path that gets backed up
set -euo pipefail
DEST=/var/www/esempio.it/dump
umask 027
install -d -m 2750 -g backup-ro "$DEST"   # readable only by root and the pull user's group

mysqldump --single-transaction --quick --routines --triggers --events \
  --default-character-set=utf8mb4 --databases esempio_wp \
  | gzip > "$DEST/esempio_wp.sql.gz.tmp"

gzip -t "$DEST/esempio_wp.sql.gz.tmp"
mv "$DEST/esempio_wp.sql.gz.tmp" "$DEST/esempio_wp.sql.gz"
The --routines and --events options are not enabled by default, --triggers is, but writing them all out makes it explicit that the dump includes procedures, events and triggers. Fidelity is needed, and so is awareness: malware can live right there, as we explain in the article on malicious SQL triggers, and a complete dump will preserve those too. The temporary file and the gzip -t check keep an interrupted dump from replacing the last good one. The script runs before the file backup, so the archive always contains the file-plus-database pair from the same moment.
How far back you need to be able to go
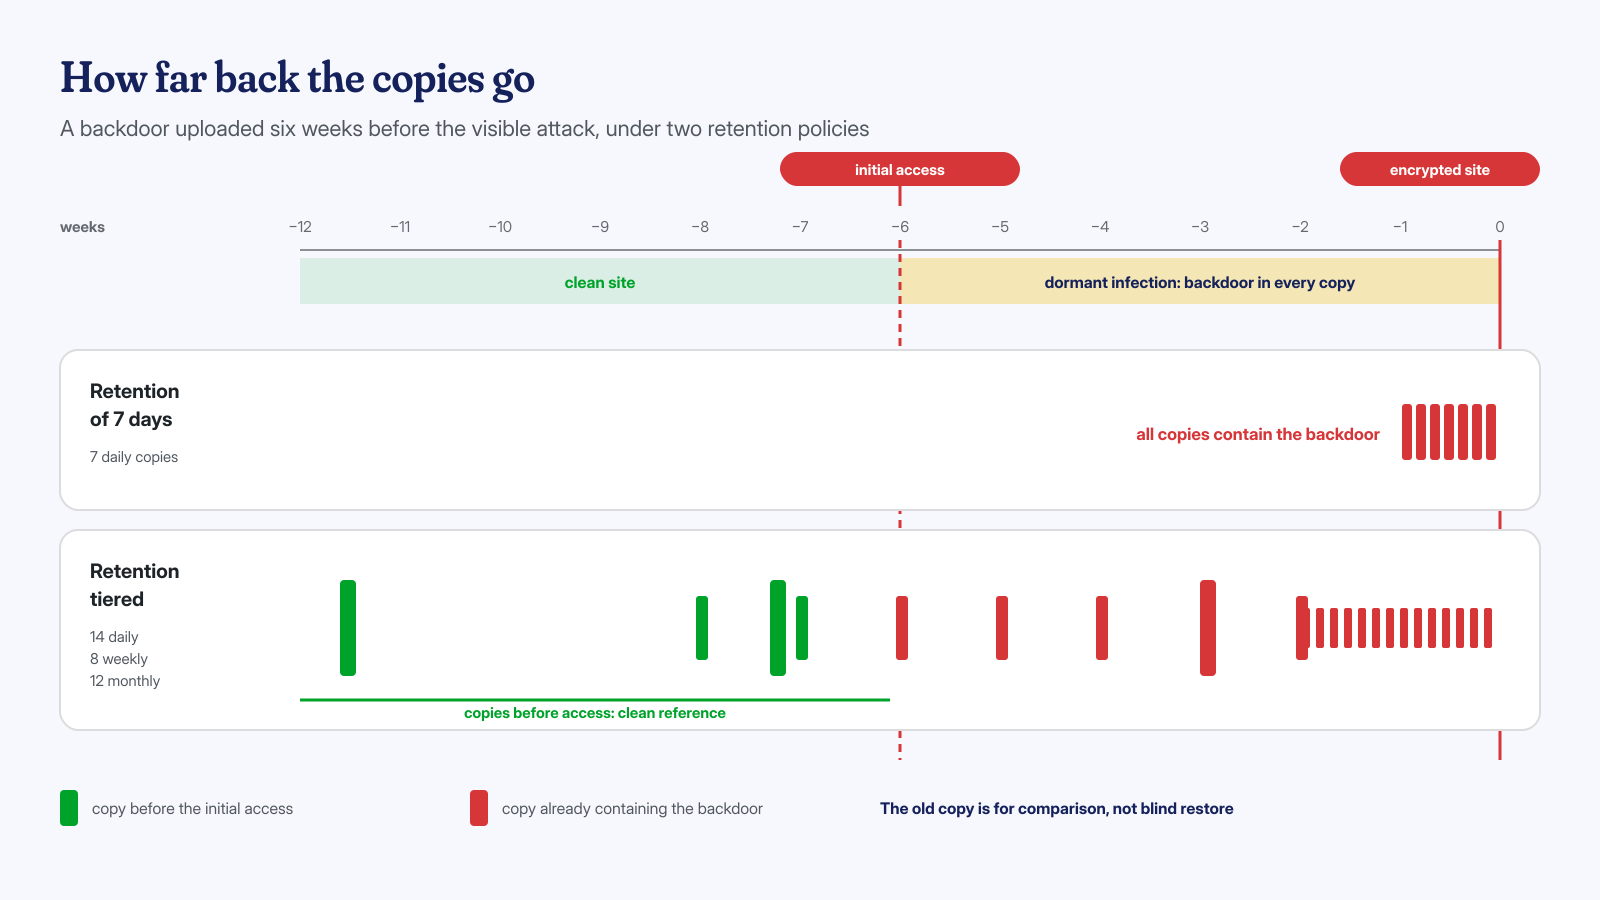
A seven-day retention seems reasonable until you discover that the backdoor was uploaded five weeks before the visible attack. This is the most common scenario: the initial access, the quiet phase in which the attacker checks they can come back, and only afterwards the encryption, the spam or the redirect. If all the available copies postdate the initial access, every restore brings the backdoor back.
That is why retention must be layered: daily copies for the last two weeks, weekly for a couple of months, monthly for a year. With restic the rule is expressed like this, to be run on the admin machine:
restic -r rest:https://admin:PASSWORD@backup01.esempio.it:8000/web01/ \
  forget --keep-daily 14 --keep-weekly 8 --keep-monthly 12 --prune
An old copy is not to be restored wholesale: it serves as a healthy reference for comparing files, recovering a custom theme before it was modified, working out when a file appeared. The choice of the copy to use, and why it should never be restored blindly, is the subject of the article on backups and malware that survives. Long retention also has a regulatory side: the copies contain personal data and must be kept according to the rules you have set for yourself, a topic we touch on when discussing GDPR and breaches.
Verify: a backup you haven’t tested doesn’t exist
The last zero in the formula is the one most often missing. There are two kinds of verification. The first is automatic and checks the integrity of the archives: for restic, restic check, which with --read-data-subset reads a rotating part of the data, as described in the restic documentation, without downloading the whole repository each time; for borg, borg check --verify-data. The second is the test restore, and no command replaces it:
# Every week: integrity check of a rotating part of the data
restic -r "$REPO" check --read-data-subset=10%

# Every month: full restore on an isolated test machine, never on the production server
restic -r "$REPO" restore latest --target /srv/prova-ripristino
gunzip -c /srv/prova-ripristino/var/www/esempio.it/dump/esempio_wp.sql.gz | mysql
mysql -e 'SELECT COUNT(*) FROM esempio_wp.wp_posts; SHOW TRIGGERS FROM esempio_wp;'
The test restore answers questions that no automatic check can ask: is the repository password still the one we think it is, and is the person who knows it still with the company? Does the dump contain all the tables, including the plugins’ ones? How long does it really take to bring the site back online? With the site restored in an isolated environment you measure the time, note the snags and update the written procedure. It is also the right moment to check that the restore doesn’t contain triggers, administrator users or PHP files you can’t explain.
An immutable backup doesn’t prevent the attack, but it changes the type of incident: from “we’ve lost the site” to “we need to restore, clean up and close the door”. For how to tell fake ransomware from the real thing and what to do in the first hours, see the article on ransomware and defacement on WordPress; to make files harder to modify on the server, the one on the read-only site. If the site is already compromised and you want to know whether your backups are usable, contact us: we clean every WordPress installation at both the application and system level with guaranteed times of 6, 12 or 24 hours from receiving access, and we tell you which copy can serve as a healthy reference.
