The phone rings, a customer writes that the site opens a betting page, Google shows a red warning instead of results, or the host sends a curt email: account suspended for sending spam. Whatever the signal, the feeling is the same, and there is only one temptation: log in to the dashboard right away, delete everything that looks strange, and make the problem disappear as fast as possible.
It’s the most understandable reaction and almost always the most harmful. The first two hours after discovering an infection decide whether the cleanup will be quick and final or turn into a series of reinfections with no clear cause. In this article we put in order the actions to take, the ones to avoid, and the moment when it makes sense to hand over to people who do this work every day.
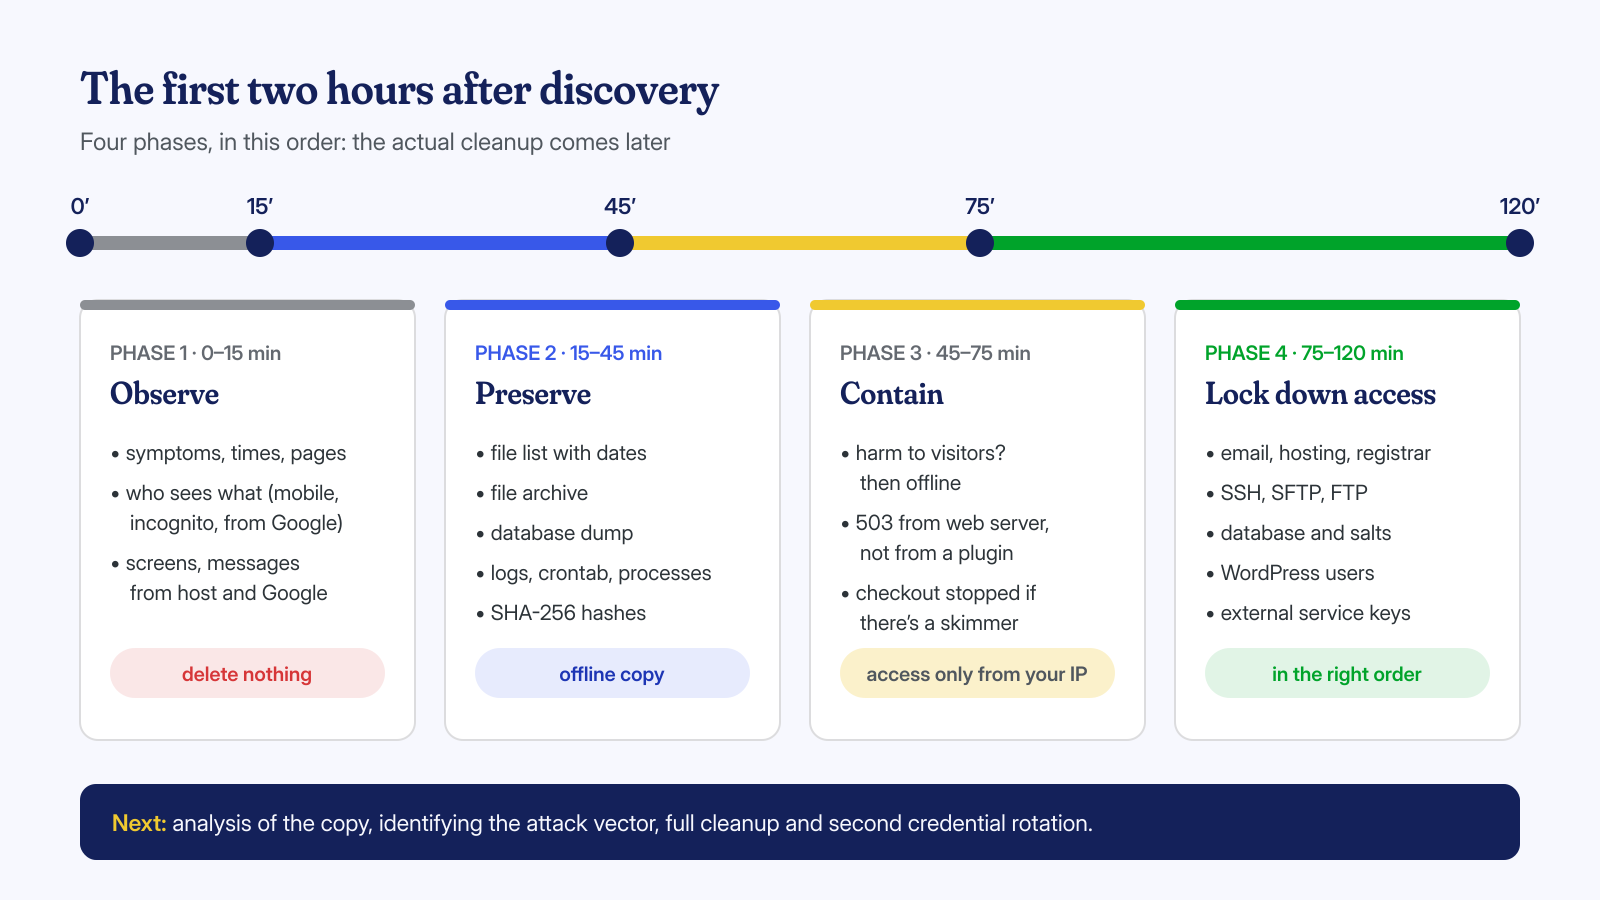
The first fifteen minutes: stop and observe
The site is already compromised: a few more minutes won’t change the severity of the incident, while one wrong action can erase exactly the traces needed to understand where the attack came in. The first task is to describe the problem precisely, before changing anything.
Open a text file and write down, with date and time:
- how you noticed the problem, and who reported it;
- exactly what you see, and under what conditions: from a computer or a smartphone, logged in or anonymous, arriving from Google or typing the address. Many infections show the malicious content only to some visitors, as we explain in the article on conditional redirects;
- the addresses of the pages involved and any domains the redirect points to;
- the messages received from the host, Google Search Console, customers, or payment networks, kept in full.
A few screenshots, the list of anomalous pages returned by a site: search on Google, and the time of the first report may seem like details, but they become valuable when it comes to establishing the attack’s time window and, later, to showing that the problem has been solved.
The forensic copy, before touching anything
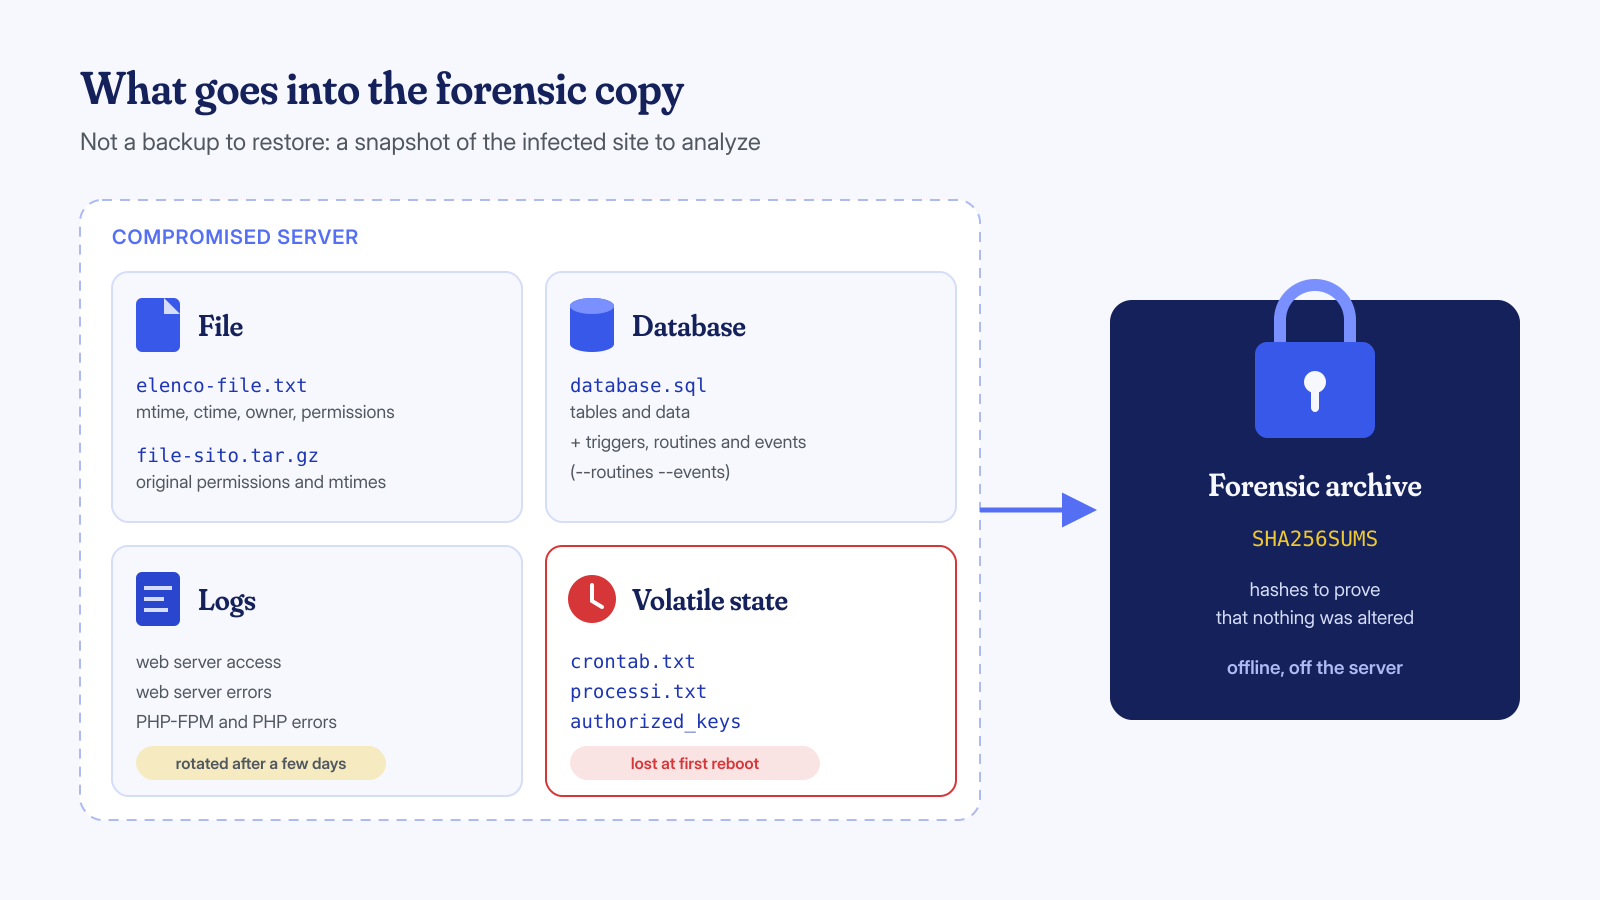
The step almost everyone skips is also the most important one: making a complete copy of the site’s current state, infection included. It is not a backup to restore, but a snapshot to analyze. Without it, every file deleted in a hurry is a lost clue, and if the cleanup doesn’t succeed there is nothing left to reason about.
A useful copy includes three things: the site files, the database, and the server logs. If you have SSH access, a few commands are enough, to run in a folder that is not reachable from the web:
# Working folder outside the document root
mkdir -p ~/incidente-2026-09-02 && cd ~/incidente-2026-09-02

# Full list of files with modification time (mtime), status change time (ctime),
# owner, and permissions: do this first, because copying files does not preserve ctime
find /var/www/esempio.it/public_html -printf '%T+ %C+ %u %m %s %p\n' | sort > elenco-file.txt

# Archive of the files, with original permissions, owners, and modification dates
tar --numeric-owner -cpzf file-sito.tar.gz -C /var/www/esempio.it public_html

# Full database, including triggers, procedures, and scheduled events
mysqldump --single-transaction --routines --triggers --events \
  -u utente_db -p nome_db > database.sql

# Hashes, to show later that the copy hasn't been altered
sha256sum elenco-file.txt file-sito.tar.gz database.sql > SHA256SUMS
For the database, mysqldump is preferable to wp db export: WP-CLI loads WordPress and therefore also the plugin and theme code, meaning potentially the malware itself. If you use WP-CLI on a compromised site, always add --skip-plugins --skip-themes. The --routines and --events options are not on by default and are needed so you don’t lose any malicious SQL triggers and procedures.
To the files and the database you need to add the logs and the system state, which are volatile: logs are rotated and deleted after a few days, and running processes vanish at the first reboot.
# Web server and PHP logs (paths vary from server to server)
cp -a /var/log/nginx /var/log/apache2 /var/log/php*-fpm.log . 2>/dev/null

# Scheduled tasks and processes of the site user
crontab -l > crontab.txt 2>&1
ps -u "$(id -un)" -o pid,lstart,args > processi.txt

# Authorized SSH keys on the account
cp -a ~/.ssh/authorized_keys . 2>/dev/null
On shared hosting without SSH you can get the same result from the control panel: the full account backup (on cPanel, for example, it includes files, databases, and configurations), downloading the access logs from the dedicated section, and a database export from phpMyAdmin with the option to include triggers and routines. Once downloaded, the copy should be stored offline, away from the compromised server.
Keep the site online or take it offline?
There is no answer that is always valid. It depends on what the malware does and who suffers the consequences. A brochure site hosting Japanese spam pages mostly damages its own search ranking; a store with a skimmer on the payment page is stealing customers’ card data with every order. In the second case the checkout must be stopped immediately, even at the cost of lost sales.
In general, put the site in maintenance mode when it exposes visitors to direct harm: data theft, malicious file downloads, phishing pages, redirects to scams. You can instead keep it online, for the strictly necessary time, when the infection is limited to spam content and stopping the site would have disproportionate costs, knowing that every extra hour lengthens the list of damage to repair.
How you put it in maintenance mode matters. A maintenance plugin runs inside WordPress, meaning inside the compromised application, and malicious code loaded before it can keep working. It is more reliable to act at the web server level, allowing access only from your own IP address and returning a 503 code to everyone else, which search engines interpret as temporary unavailability:
# NGINX, in the site's server block
location / {
    if ($remote_addr != 203.0.113.10) { return 503; }
    try_files $uri $uri/ /index.php?$args;
}

# Apache 2.4, at the top of the .htaccess in the document root
RewriteEngine On
RewriteCond %{REMOTE_ADDR} !^203\.0\.113\.10$
RewriteRule ^ - [R=503,L]
A static courtesy page served with the 503 is enough. A downtime of a few hours or a few days does not harm indexing, while continuing to serve malicious content can get you added to a blacklist, which takes a separate procedure to get out of, described in the article on removal from Google blacklists.
Change credentials in the right order
All passwords need to be changed, that much is well known. Less well known is that the order matters. If you change the database password while an active backdoor is still in the site, the attacker can read the new password from wp-config.php a moment later. If you change the WordPress password but not that of the mailbox used for recovery, a single reset request is enough to get back in.
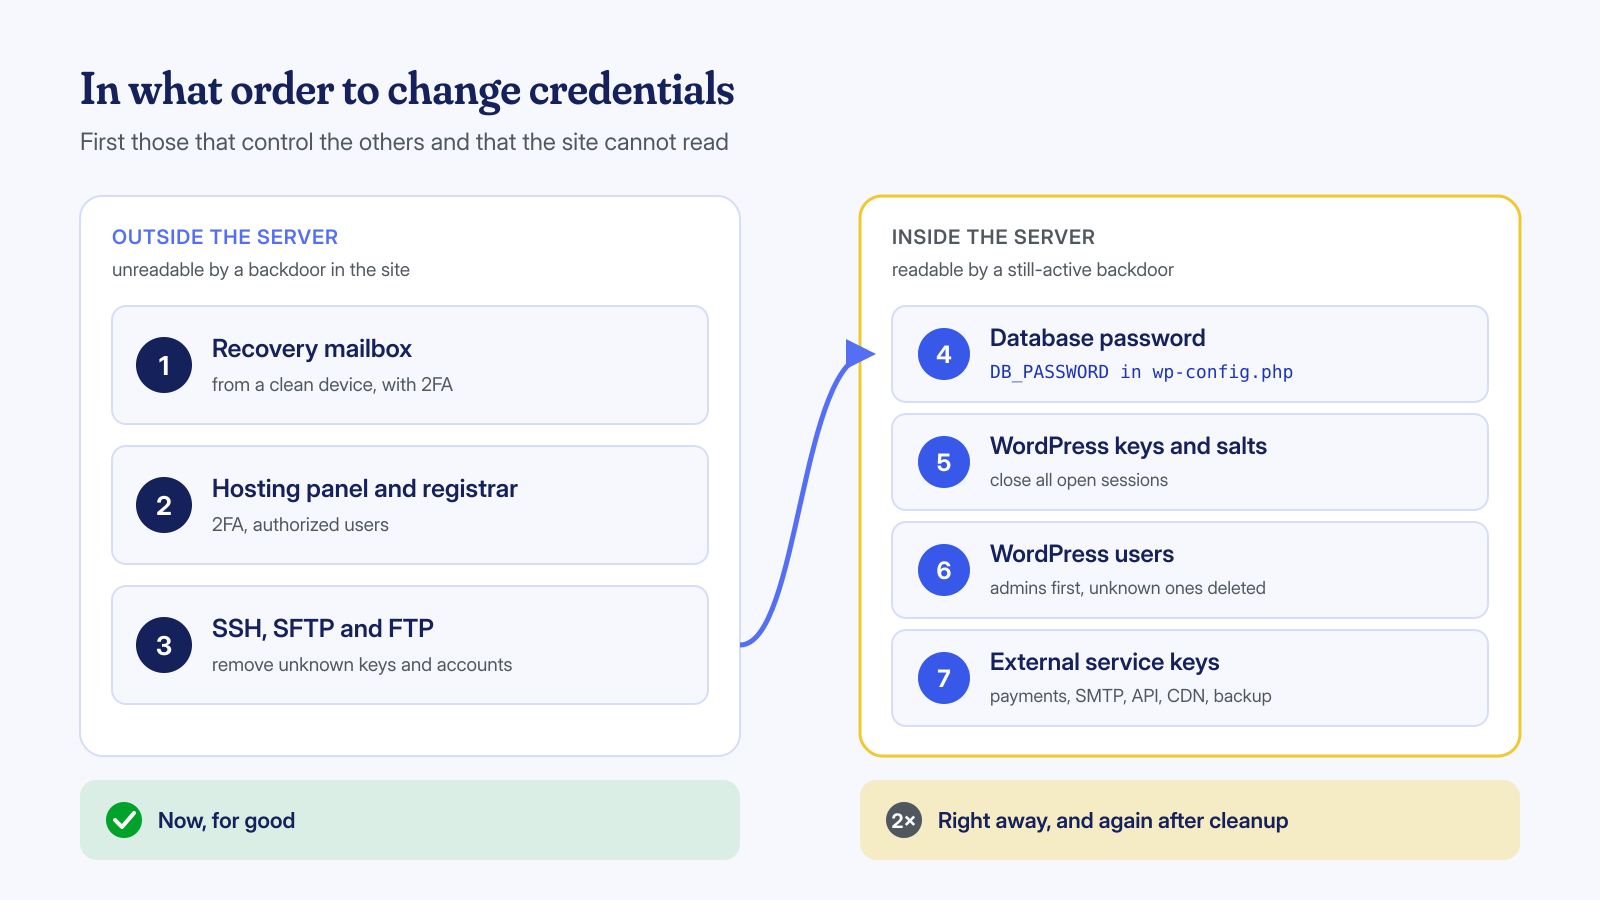
The rule is to start from the credentials that control the others and live outside the compromised server, and work your way to the ones inside the site:
- the mailbox tied to the hosting, the domain registrar, and the WordPress administrator, from a clean device and with two-factor authentication;
- the hosting and registrar panels, these too with a second factor, checking the authorized users;
- server access: SSH, SFTP, and FTP, removing SSH keys you don’t recognize and FTP accounts created by others;
- the database, updating
DB_PASSWORDinwp-config.phpright afterward; - WordPress keys and salts, which invalidate all open sessions, including the attacker’s;
- WordPress users, starting with the administrators, deleting unknown ones;
- external service keys: payment gateways, SMTP, APIs, CDN, backup services.
The first three items can be changed for good right away, because the site cannot read them. The others live inside the server: change them now, to cut off sessions in progress, and again at the end of the cleanup, when you are sure no backdoor can read them.
# New database password (from MySQL or MariaDB, as administrator)
ALTER USER 'utente_db'@'localhost' IDENTIFIED BY 'nuova-password-lunga-e-casuale';

# Update wp-config.php, without loading plugins and theme
wp config set DB_PASSWORD 'nuova-password-lunga-e-casuale' --skip-plugins --skip-themes

# New keys and salts: all existing sessions are closed
wp config shuffle-salts --skip-plugins --skip-themes

# Existing administrators, with registration date
wp user list --role=administrator --fields=ID,user_login,user_email,user_registered \
  --skip-plugins --skip-themes
An administrator you don’t recognize is a clue to document before deleting it: the registration date helps date the attack. In the article on ghost administrators we explain how to find those hidden from the user list as well.
Check the hosting account, not just WordPress
An attack that has achieved code execution on the site has, in most cases, the same permissions as the system user that runs it. On shared hosting that user often sees every site in the account: the blog forgotten in a subfolder, the test installation, the old domain that was never deleted. Cleaning one site and leaving the one next to it infected means having the same problem again a few days later.
Beyond the sites, check these in the hosting panel:
- the account’s scheduled tasks, one of the favorite places for persistence, as we describe in the article on backdoors in cron jobs;
- FTP accounts and SSH keys added recently;
- mailboxes and forwards, sometimes used to send spam or to intercept password resets;
- DNS records and subdomains, which may have been added to host phishing pages under the domain’s name;
- account-level PHP configuration files, such as custom
.user.iniorphp.ini, where theauto_prepend_filedirective can load malicious code before every page.
If the server is dedicated or a VPS, the perimeter widens: running processes that no longer have a file on disk, as we explain in the article on PHP processes in memory, services listening on unusual ports, new system users. In this case it is also worth notifying the provider right away, who may have visibility into traffic and alerts that can’t be seen from the inside.
What not to do
Some mistakes recur on nearly every site that reaches us after a first do-it-yourself cleanup attempt. They are not mistakes of incompetence: they are the moves that seem reasonable under pressure.
- Deleting suspicious files one by one. You remove the visible effects and the evidence, while the backdoor that created them stays in place.
- Immediately restoring the latest backup. If you don’t know when the infection began, you don’t know whether the backup is clean; and even if it were, the vulnerability the attack came through is still there.
- Updating everything and considering the problem closed. The update fixes the vulnerability, but doesn’t remove backdoors already installed, which no longer depend on that flaw.
- Installing three different security plugins. They run inside the compromised application and see only part of the problem, for reasons we explore in the article on the limits of scanners.
- Requesting a Google review right away. A request rejected because the site is still infected lengthens the time for the next one.
- Contacting the attacker or paying a ransom. It gives no guarantee and signals that the site has an owner willing to pay.
Every file deleted before you understand how it got there is a question that can never be answered.
If personal data is involved
A site with a members area, contact forms, newsletter signups, or an online store processes personal data. If the attack may have exposed it, this is a personal data breach under the GDPR, and Article 33 of the Regulation requires the controller to notify the supervisory authority, in Italy the Italian Data Protection Authority (Garante), within 72 hours of becoming aware of it, unless the breach is unlikely to result in a risk to the people involved.
The first two hours are the right time to alert whoever handles data protection in the company and, if there is one, the legal advisor. You don’t need to have all the answers yet: the risk assessment is built on exactly the information gathered in the forensic copy. It is another good reason not to delete evidence, and to note the times of discovery carefully. If card payments go through the site, the payment service provider must also be informed, since it has its own procedures for these cases.
When to call a specialist
Many simple incidents can be handled on your own, with method and a backup copy on hand. Some signs, though, indicate that the problem goes beyond the WordPress files and that you need someone used to looking at the system too:
- the infection returns after the cleanup, often at the same time of day;
- there are unreadable or encoded files of unknown origin;
- the site handles payments or sensitive data;
- there are many sites on the same account or server;
- you have no access to the logs or the command line, and so can’t reconstruct the attack vector.
Anyone who comes to us with a well-made forensic copy saves time for both of us: the logs say where the attack came in, the file list with dates says what it touched, the database says what it left behind. Our work starts from there and covers files, database, scheduled tasks, and server processes, with log analysis to identify the entry point. The cleanup of a WordPress installation is guaranteed within 6, 12, or 24 hours depending on urgency; if you’re in the first hours of an incident and unsure what to do, write to us, even just to find out which steps to secure first.
