An infected WordPress site rarely announces itself with an explicit message. More often it’s indirect signs that raise the alarm: a customer writes that on their phone the site opens a betting page, Google adds the warning “This site may have been hacked”, the host suspends the account for sending spam, or an administrator shows up among the users that nobody remembers creating. At that point there is only one question: how do you remove the malware, and how do you make sure it doesn’t come back?
This guide describes the method we use every day in our cleanups, from the first containment to the review in Google Search Console. It isn’t a list of plugins to install: it’s a procedure, because the difference between a cleanup that holds and one that repeats every two weeks isn’t the tool, but the order in which things are done and how deep you look. Some steps require SSH access and a bit of familiarity with the command line; where they do, we say so clearly.
Before you touch anything
The instinctive reaction to a compromised site is to delete everything that looks suspicious right away, or to restore the latest backup and consider the matter closed. Both moves destroy the information needed to understand what happened, and restoring on its own puts back online the same vulnerability that allowed the attack, often together with a backdoor already present in the backup. We covered this in the article on why restoring a backup is not enough.
There are three first steps, in this order.
- Preserve the evidence. A complete copy of the files, a database dump and the web server logs exactly as they are, before any change. This is the foundation for all the work that follows: it lets you compare, reconstruct the timeline and, if needed, prove what happened. File modification dates must be preserved, so make the copy with tools that keep them, such as
tarorrsync -a. The procedure is described step by step in the guide on what to do in the first two hours. - Contain the damage. If the site redirects visitors to malicious pages, serves fake browser updates or collects payment data, every hour online means more victims. A maintenance page served by the web server, or access limited to your own IP address, stops the damage without deleting anything.
- Assess your obligations. If the site handles personal data, such as customer accounts, orders or contact forms, a breach may amount to a data breach that must be reported to the Italian Data Protection Authority (Garante) within 72 hours of discovery. The countdown starts immediately, not when the cleanup is done: you’ll find the criteria in the article on hacked sites and the GDPR.
It’s also a good idea to notify your host: on a shared server the infection may not be limited to your site, and the provider may have logs or tools you can’t see from your panel.
Recognizing the infection: symptoms and false negatives
Much WordPress malware is designed not to be seen by the site owner. The most common signs are these:
- redirects to betting, pharmacy or scam sites, which appear only on mobile, only when arriving from Google, or only on the first visit;
- search results flooded with Japanese-language pages or products the site doesn’t sell;
- Google Search Console warnings in the “Security issues” section, or the red Safe Browsing warning in the browser;
- unknown administrator users, passwords that no longer work, plugins that appear or disappear;
- constantly high server CPU, slowdowns without an increase in traffic, outgoing mail blocked because the server’s address ended up on a blocklist;
- PHP files with random names, or with names that imitate WordPress ones, in folders where they shouldn’t be.
The first point deserves attention: a conditional redirect checks who is visiting the page and activates only for visitors who are not the owner. Anyone opening the site from their own computer, perhaps already logged into WordPress, sees everything as normal. The same goes for Japanese SEO spam, which shows the injected pages only to Google’s crawler.
For this reason an “all clean” result from an external scanner or a security plugin doesn’t prove the site is healthy. Online scanners only see the HTML the site returns to them; signature-based plugins recognize malicious code that is already known and cataloged, and struggle with code that is obfuscated in a new way, hidden in the database or outside the WordPress folder. They are useful for initial orientation, not for diagnosis: we explained the limits of signature-based scanners in a dedicated article.
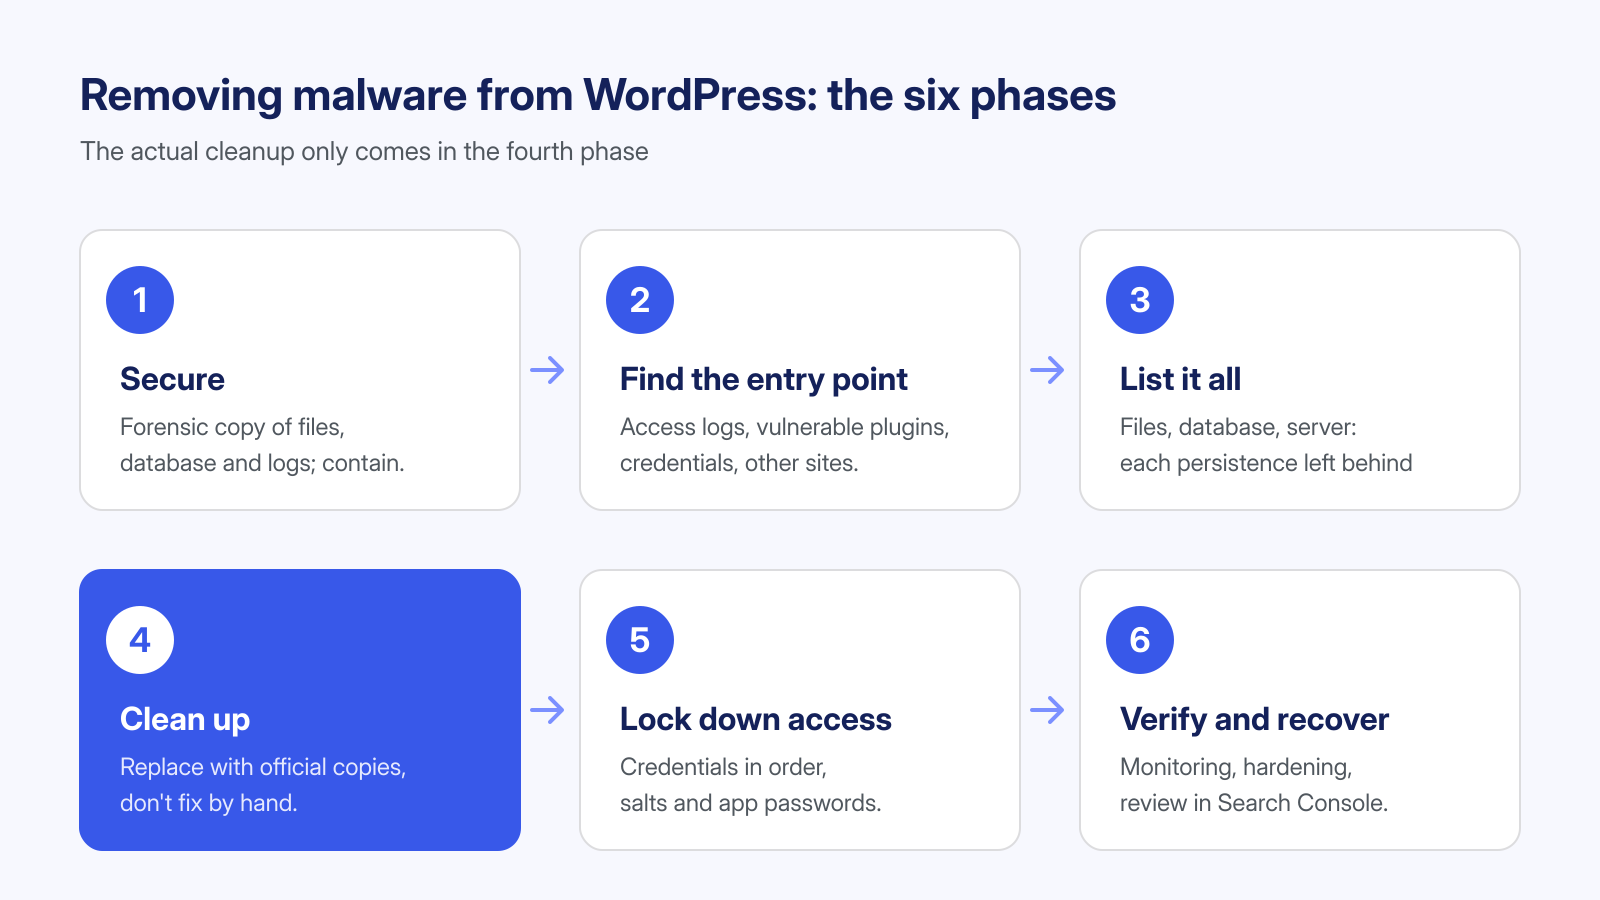
Phase 1: understand where it got in
This is the phase that hasty guides skip, and it is the main reason infections come back. If you don’t identify the entry point, you clean a site that stays open: whoever got in once gets back in with the same method, often within a few days and almost always automatically.
The four causes we find most often are:
- A vulnerable plugin or theme, either not updated or hit by a flaw that hasn’t been fixed yet. In these cases the entry leaves precise traces in the access logs: POST requests to a plugin file or to
admin-ajax.phpwith an unusual action, followed by the appearance of a new file. For flaws without a patch, see what we wrote about 0-day vulnerabilities in plugins. - A “nulled” plugin or theme, that is a premium version downloaded for free from unofficial sites, with the backdoor already included. There is no attack to look for in the logs here: the malware was installed by the owner themselves, without knowing it. We discuss this in nulled plugins and “free” themes.
- Stolen credentials: reused passwords that ended up in a breach database, or FTP credentials saved in the client of a developer whose computer was infected. In this case the logs show valid logins, not attack attempts, and cleaning the site is useless unless you change the passwords first. The typical case is described in the article on stolen FTP credentials.
- Another site on the same account, perhaps an old forgotten installation in a subfolder, from which the infection spread to all the sites sharing the same system user. This is the cross-contamination typical of shared hosting.
The main tool is the web server’s access logs. You start from the modification date of the first malicious file found and look back for the requests that created it or used it for the first time. The method is described in from log to attack vector; if the logs are large, an AI model run locally can help sift through them without sending data to external services, as explained in the article on log analysis with local AI.
The entry point can’t always be found with certainty: many hosts keep logs for only a few days, and an infection discovered after months may have erased the traces. In that case you proceed by elimination, closing every plausible route: updating or replacing every component, removing everything that isn’t essential, changing all credentials.
Phase 2: find everything the malware left behind
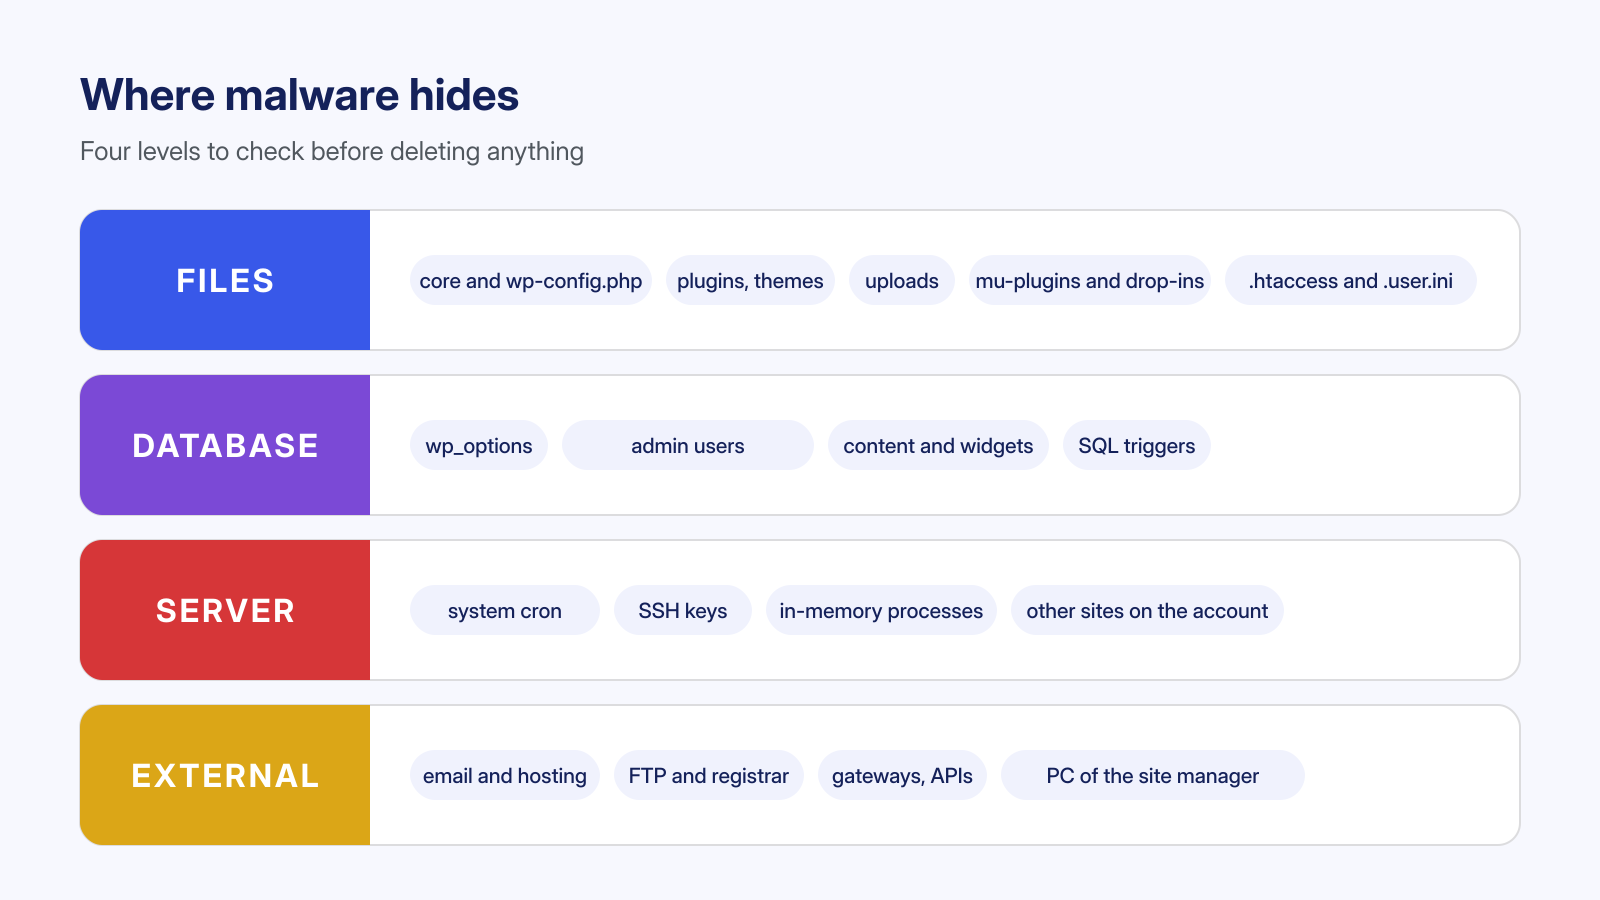
A real infection is almost never a single file. Whoever gets into a site usually installs several access points in different places, so that removing one leaves the others working. Before deleting anything you therefore need to take a complete inventory, level by level.
WordPress core
Core files are identical for every installation of the same version, so they can be compared with the original. With WP-CLI a single command is enough:
wp core verify-checksumsThe command compares every file with the checksums published by WordPress.org and reports modified files and those that shouldn’t be there, such as an altered wp-login.php or an extra file inside wp-includes. Its documentation describes the options. It does not check wp-config.php, however, which differs for every site and must be read by hand: the lines to look for are inclusions of external files, code before the /* That's all, stop editing! */ line, and constants you didn’t set yourself.
Plugins and themes
For plugins published on WordPress.org the same check exists: wp plugin verify-checksums --all. Premium plugins and themes have no public checksums, so the comparison is made against a copy downloaded from the developer’s official account, of the same version installed. The most frequently hit spots in themes are functions.php, the header and the footer, as explained in the article on malware in WordPress themes. Watch out for encrypted files: a legitimate plugin may be protected with ionCube and must not be mistaken for malware, but the opposite can’t be ruled out either; the criteria for telling them apart are in the article on obfuscated PHP files.
The uploads folder
In wp-content/uploads there should only be images, documents and files generated by plugins, almost never PHP files. A search such as find wp-content/uploads -name "*.php" often brings up webshells, the small scripts that let you run commands on the server from a browser. You should also look for files with double extensions and images that contain PHP code. After the cleanup, PHP execution in that folder should be blocked at the web server level, as described in the guide on webshells in the uploads folder.
mu-plugins, drop-ins and configuration files
Some files are loaded automatically by WordPress or PHP without appearing in the plugin list. Must-use plugins in wp-content/mu-plugins and drop-ins such as object-cache.php or db.php run on every request and can’t be deactivated from the dashboard: for an attacker they are the ideal spot, as explained in the article on mu-plugins and drop-ins. Even further upstream, .htaccess and .user.ini, with directives such as auto_prepend_file, make a file run before any page of the site, even if that file is outside the WordPress folder: you’ll find the details in hidden backdoors in .htaccess and .user.ini.
The database
A site with all its files replaced by official copies can remain infected, because part of the malware lives in the database. The places to check are:
- the
wp_optionstable, where options with plausible names contain serialized code, base64-encoded code, or code executed by a fragment left in a file; the method for finding them is in the article on serialized payloads in wp_options; - users: administrators created by the malware, often hidden from the dashboard list with a filter, which can only be seen by querying the database directly or with
wp user list --role=administrator, as explained in the guide on hidden admin users; - the content of posts and pages, where external scripts and hidden links are inserted directly into the text, and widgets;
- SQL triggers, little known but very effective: statements stored in the database that re-activate on every new post or new user, and that no file scanner sees. They are listed with
SHOW TRIGGERS; we discuss them in SQL triggers and malware in the database.
On WooCommerce sites, pay particular attention to everything that ends up on the payment page: a JavaScript skimmer can sit in a database option, in a widget or in a script loaded from an external domain, and it collects card data without altering how the store works.
Beyond WordPress: the server
This is the level that separates a cleaning from a cleanup. If the attacker could run commands on the server, they could also leave persistence mechanisms outside the site’s folder:
- system cron jobs that every few minutes re-download the malware or recreate deleted files: this is the most common reason a site “reinfects itself” the day after the cleanup, as explained in the article on backdoors hidden in cron jobs;
- added SSH keys in the user’s
authorized_keysfile, which allow getting back in even after all passwords have been changed; - resident processes, that is PHP scripts or binaries that keep running even after their file has been deleted from disk, described in the article on “deleted” PHP processes; the most frequent case is the cryptominer that keeps the CPU maxed out;
- mail-sending scripts that use the server to send spam and ruin the domain’s reputation, as described in the server that sends spam;
- the other sites on the same account, all of which must be checked: a single infected installation is enough to recontaminate the others.
On shared hosting many of these checks aren’t possible from the panel: in that case, ask the provider to check the account’s cron jobs, processes and keys.
A practical aid in this phase is dates. The command find . -type f -newermt "2026-10-01" lists files modified after a given date, and malicious files tend to cluster around the time of entry. It isn’t proof, because dates can be forged and legitimate updates modify many files, but it helps bring order to the search.
Phase 3: cleanup, by replacing rather than fixing
Only now, with the complete inventory and the entry point identified or at least narrowed down, do you move on to cleanup. The principle is simple: an infected file isn’t fixed by deleting the suspicious lines, it’s replaced with an official copy. Fixing by hand means trusting that you’ve seen everything, and malicious code is written precisely so as not to be seen.
- Core. Download the same WordPress version again with
wp core download --force --skip-contentor from the official site, and remove the extra files flagged by the checksum check. Thewp-adminandwp-includesfolders can be replaced entirely. - Plugins and themes. Reinstall every plugin from WordPress.org or from the developer’s account, in the latest available version. Delete those that are deactivated, abandoned for years or of uncertain origin: every component fewer is one door fewer. Nulled plugins are replaced with the official license or with an alternative.
- Uploads and configuration. Delete the PHP files and scripts found in
uploads, the mu-plugins and drop-ins you didn’t install, and the foreign directives in.htaccessand.user.ini. Rebuild thewp-config.phpfile starting from the original template, copying back only the connection details and the constants you know. - Database. Remove the malicious options, triggers, unrecognized users and the code injected into content. Caution is needed here: a wrong
DELETEonwp_optionscan break the site, so every change is made after a backup and with targeted queries, not with a generic search and replace. - Server. Remove foreign cron jobs, SSH keys and resident processes, and check the account’s other sites in the same way.
If the site’s content is essentially static, an alternative route is rebuilding: a new, clean installation, plugins reinstalled from scratch, importing only the cleaned database and only the verified media files. It takes more time but gives the strongest guarantees, and it is the recommended choice when the infection is very extensive or has been going on for months.
Phase 4: close the access
After the cleanup all credentials must be changed, and the order matters. If the attacker can still read your email inbox, every new password that reaches you by email reaches them too. So you start from the outside and work your way to WordPress:
- the email account tied to the hosting and to administrator accounts, with two-step verification enabled;
- the hosting panel and the domain registrar;
- FTP, SFTP and SSH access, deleting unneeded FTP users and SSH keys you don’t recognize;
- the database password, then updated in
wp-config.php; - the secret keys (salts) in
wp-config.php, which you regenerate withwp config shuffle-saltsand which invalidate all open sessions at once, including the attacker’s; - the passwords of all users with the administrator or editor role, and application passwords, which allow API access without going through the login and survive a change of the main password;
- the keys of connected services: payment gateways, WooCommerce API, mail services, CDNs and external backup tools.
If the entry point was credentials stolen from the computer of whoever manages the site, that computer must be checked before typing the new passwords: otherwise those will be stolen too. For administrator accounts, enable two-factor authentication right away.
Phase 5: verify and keep an eye on the site
A cleanup isn’t finished when the last file has been deleted, but when you’ve verified that the site is clean from every point of view:
- the core and plugin checksum checks no longer report differences;
- the site, visited from mobile, in an incognito window and with Googlebot’s user agent, shows the same content;
- the Search Console “URL Inspection” tool shows the page as Google sees it, with no foreign content;
- the access logs no longer show successful requests to the removed files, and attempts to reach them return an error;
- server CPU, processes and mail queue are back to normal.
Then the site should be kept under observation for a few weeks. Requests to the old backdoors will keep arriving, because whoever installed them has registered them in automated lists: that’s normal, and the logs help you tell whether someone is trying new routes. File integrity monitoring flags any unexpected change right away. At that point you complete the defenses with the post-cleanup hardening checklist: correct permissions, PHP execution blocked where it isn’t needed, file editing disabled from the dashboard, and if needed a WAF.
Phase 6: recover your reputation
If Google has flagged the site, the warning doesn’t disappear on its own as soon as the malware is removed. In the “Security issues” section of Search Console you request a review, describing what was found and what was done; the request should be sent only when the cleanup is truly complete, because a rejection lengthens the time of subsequent reviews. The procedure, with the mistakes to avoid, is described in the article on blacklist removal.
The same goes for other blocklists: those of antivirus vendors, those of mail filters if the server sent spam, and those of phishing services if the site hosted a phishing kit. Finally, for SEO spam, the injected pages must be removed from the index: they must return a 404 or 410 error, and if there are many you can request their temporary removal from Search Console while Google recrawls them.
The mistakes that bring malware back
In most of the reinfections that reach us, the previous cleanup failed on one of these points:
- a backup was restored without checking it and without fixing the vulnerability;
- only a security plugin was used, and what it flagged was deleted, leaving the rest;
- files were fixed by hand instead of replaced;
- the database and the server were not checked;
- passwords were changed before the cleanup, or not all of them were changed;
- an old test site in the same hosting area was forgotten;
- the vulnerable plugin was reinstalled in the same version, or the nulled one went back in its place.
When DIY isn’t enough
Some infections can be resolved with the guidance in this guide, especially when the malware is recent, limited to files and the site is small. There are, however, situations in which it’s better to rely on people who do this work every day:
- the site has already been cleaned once and the infection came back;
- you don’t have SSH access, or you aren’t comfortable with the command line and the database;
- the site sells online or handles personal data, and every hour offline has a cost;
- Google has already flagged the site, or the host has suspended the account;
- the symptoms involve the server: high CPU, outgoing spam, unknown processes.
If you are looking for outside help, before choosing read the questions to ask a malware removal service: clarifying what is checked, whether the server is included and what happens in case of reinfection avoids a lot of surprises.
Our cleanup service follows the procedure described on this page, with a fixed price and a maximum turnaround time written into the contract. You can choose the plan according to urgency: cleanup within 6 hours or within 12 hours, counted in consecutive hours including nights and holidays, or within 24 business hours. With every plan we remove malware, backdoors and persistence in files, database and server, close the door they came in through, and guide you through the Google review request; if the malware reappears within 30 days, we remove it again for free.
Frequently asked questions
Is a security plugin enough to remove malware?
Rarely. Security plugins are useful for spotting known files and for flagging changes, but they work from inside WordPress: they don’t see the server, they struggle with code in the database and with code obfuscated in a new way, and malware that already controls the site can disable or fool them. They should be considered a tool of diagnosis, not the diagnosis.
Can I just restore a backup?
Only if you know for certain when the entry happened, if the backup predates it, and if before putting the site back online you fix the vulnerability that was exploited. In practice infections are discovered weeks or months later, so even the oldest backups may contain the backdoors; moreover, restoring doesn’t touch cron jobs, SSH keys and the account’s other sites.
How long does it take to clean a WordPress site?
It depends on the extent of the infection more than on the size of the site. A recent infection limited to files is resolved in a few hours; one that has been there for months, with code in the database, persistence on the server and several sites involved, takes a day of work or more. On top of that comes Google’s review time, which usually runs from one day to a few days after the request.
Can the infected site harm visitors?
Yes. Much malware uses the site to attack those who visit it: it redirects them to scams, shows them fake browser updates or fake CAPTCHAs that install malicious programs, or steals their payment data. That’s why Google flags infected sites and why, until the cleanup is finished, it’s best to keep the site offline or in maintenance mode.
How do I keep it from happening again?
By closing the cause and reducing the opportunities: regular updates of core, plugins, themes and the PHP version, only components from official sources, unique passwords and two-factor authentication, verified backups stored off the server, and periodic file integrity checks. No single measure makes a site invulnerable, but together they make an attack much harder and much easier to catch in time.
