A well-done cleanup gives you back a clean site, but not a site that is any sturdier than before. If the entry point was a vulnerable plugin, a reused password or a file permission set too wide, the same gap stays open until someone closes it. That is what hardening is: reducing the chances of a new attack and, if one comes anyway, limiting the damage and making it visible quickly.
This checklist collects the measures we apply after a cleanup, divided by level: WordPress, PHP, web server and system. It does not repeat the details already covered in the article on wp-config.php, salts and permissions: here the goal is the complete picture, with the commands to put it into practice.
No single measure makes a site invulnerable. Many measures together mean an attack has to get past several obstacles, and every obstacle leaves a trace.
Why hardening comes after cleanup
Order matters. Tightening a site that is still infected does little good: a backdoor already in place keeps working even with the right permissions, and a rule in the .htaccess file can be deleted by someone who already has write access. First you remove the malware and every form of persistence, including those that do not live in WordPress files, such as cron jobs, processes left in memory and database triggers. Then you close the gap the attack came in through and raise the defenses around it.
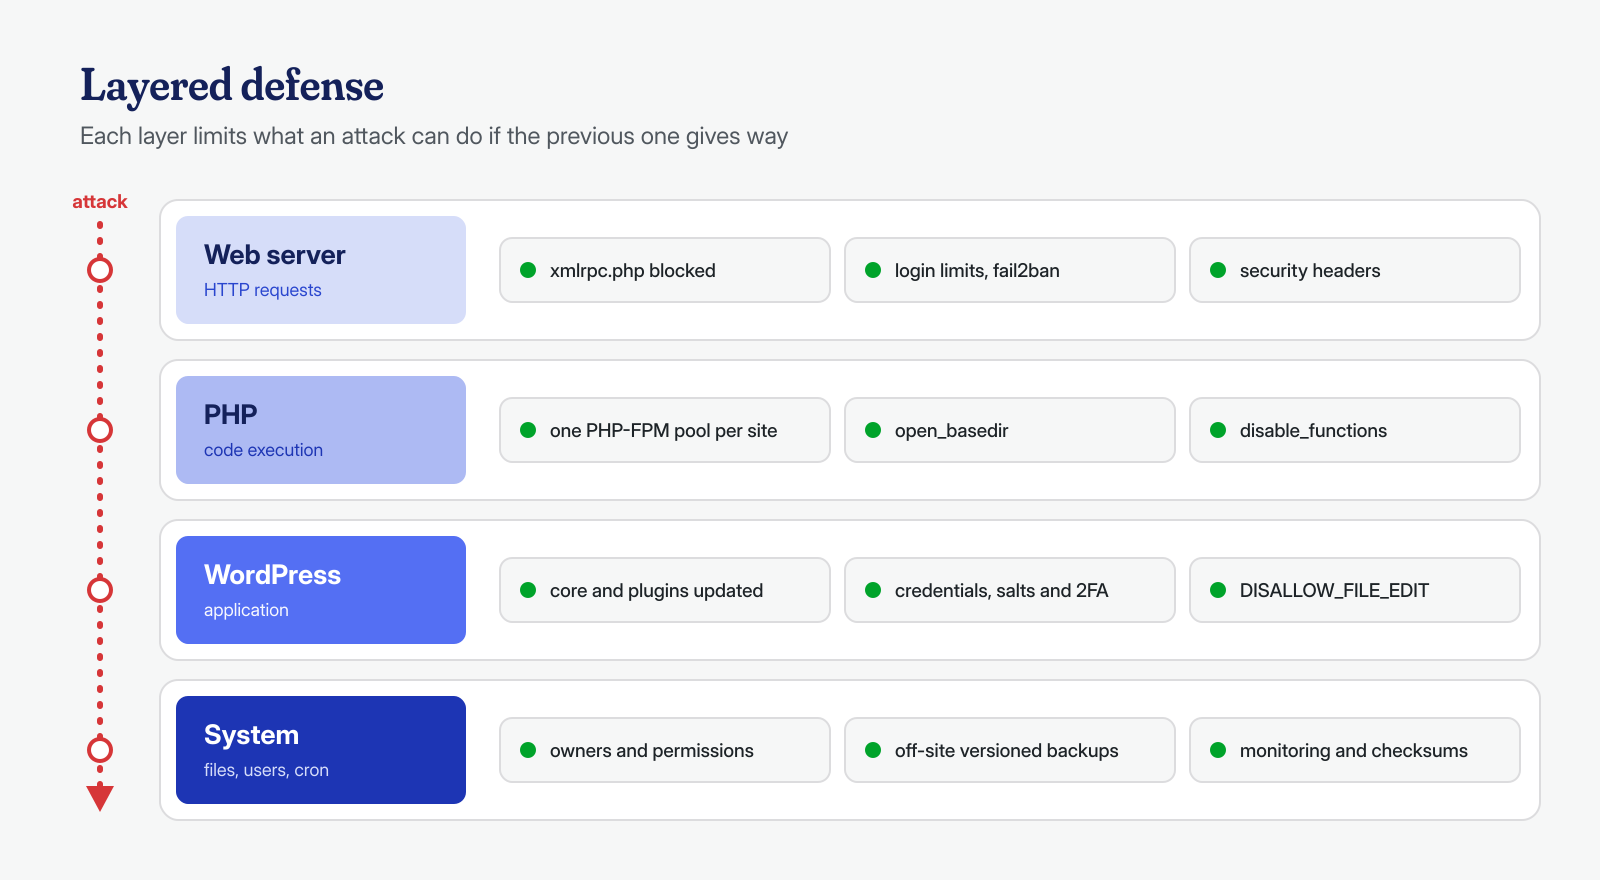
It also helps to think in layers. A WordPress site is not just an application: it runs inside a PHP interpreter, behind a web server, on an operating system with its own users and scheduled tasks. Each layer has its own measures.
WordPress: updates and a smaller attack surface
Most of the infections we see start from an add-on component, not from the core. This is consistent with public data: according to Patchstack’s State of WordPress Security in 2025 report, of the 7,966 new vulnerabilities in the WordPress ecosystem recorded in 2024, 96% were in plugins. The first item on the checklist is therefore knowing what is installed and whether it is up to date.
# Core, plugins and themes with updates available
wp core check-update
wp plugin list --update=available --fields=name,version,update_version
wp theme list --update=available

# Update everything (after a backup)
wp core update && wp core update-db
wp plugin update --all
wp theme update --all

# Automatic updates for plugins (WP-CLI 2.5 or later)
wp plugin auto-updates enable --all
The second item is removing what is not needed. A deactivated plugin does not run code through WordPress, but its files stay on disk and stay reachable from the browser: if they contain a vulnerable script that can be called directly, deactivation protects nothing. The same goes for unused default themes and for forgotten test copies in subfolders.
# Inactive plugins and themes: candidates for deletion
wp plugin list --status=inactive --field=name
wp theme list --status=inactive --field=name

# After checking them one by one
wp plugin delete plugin-name
wp theme delete twentytwentyone
If a plugin has been abandoned by its author, meaning it has not received updates for a long time or has been removed from the official directory, it should be replaced even if it has no known vulnerabilities at the moment: when it gets one, nobody will fix it.
Finally, two wp-config.php constants: DISALLOW_FILE_EDIT, which removes the theme and plugin editor from the dashboard, should always be enabled; DISALLOW_FILE_MODS, which also blocks installs and updates from the dashboard, only makes sense if updates go through WP-CLI or a deployment process. The reasoning is explained in the article on wp-config.php.
Credentials, application passwords and 2FA
After a compromise, all credentials must be considered read: those of the WordPress users, the database password, SFTP, SSH and hosting panel logins, the API keys stored in plugin options. Keys and salts are regenerated with wp config shuffle-salts, which logs out all users. But there are two items that are often forgotten.
The first is the users themselves. An attack often creates an extra administrator, sometimes hidden from the dashboard list with a filter: the check has to be done from WP-CLI or directly in the database, as explained in the article on ghost administrators. The second is application passwords, introduced in WordPress 5.6 for REST API access. They are independent of the user’s password: changing that does not invalidate them, and an application password created by the attack keeps working.
# Existing administrators
wp user list --role=administrator --fields=ID,user_login,user_email,user_registered

# Application passwords of a user, and revoking all of them
wp user application-password list 1 --fields=uuid,name,created,last_used
wp user application-password delete 1 --all

# Active sessions of all users
wp user session destroy --all-users
If no integration uses application passwords, they can be disabled entirely with one line in a must-use plugin: add_filter( 'wp_is_application_passwords_available', '__return_false' );. This is also a good moment to remember that the mu-plugins folder needs careful checking, because it is one of the favorite hiding places for backdoors.
Administrators, and anyone who can publish code or install plugins, need two-factor authentication. WordPress does not include it in core, but established plugins exist, including Two Factor, developed by contributors to the WordPress project. A second factor based on an app (TOTP) or a security key makes a password stolen from an infected computer or from another breached service useless.
Files: ownership, permissions and uploads
The reference values for permissions, 644 for files and 755 for folders, are already in the article on wp-config.php. What counts here is something that makes more difference than the numbers: who owns the files and which user PHP runs as. If they are the same, any code run by PHP can rewrite the entire installation, core included. If they differ, PHP can write only where it is explicitly allowed.
# Files owned by a deploy user, readable by the PHP group
chown -R deploy:esempio /var/www/esempio.it/htdocs
find /var/www/esempio.it/htdocs -type d -exec chmod 750 {} +
find /var/www/esempio.it/htdocs -type f -exec chmod 640 {} +

# Write access allowed only in uploads (and in caches, if needed)
chmod -R g+w /var/www/esempio.it/htdocs/wp-content/uploads
In this scheme deploy is the user who uploads the code and runs updates with WP-CLI, while esempio is the user of the site’s PHP pool, which we discuss further on. The web server must be able to read static files, so it needs to be added to the group or wider read permissions are needed: it depends on the configuration. Updates from the dashboard no longer work, but a vulnerable plugin cannot modify wp-includes or inject code into index.php.
The uploads folder has to stay writable, which is why PHP must not be executable inside it. The rules for Apache, LiteSpeed and NGINX are in the article on webshells in uploads: if they are not yet applied, it is one of the first things to do, ideally in the server configuration and not in an .htaccess that the site user can modify.
PHP: one pool per site, open_basedir and disable_functions
On a server with several sites, the most effective measure at the PHP level is to give each site its own PHP-FPM pool, with a dedicated system user. With a single shared pool, all sites run as the same user: one vulnerable plugin in any of them is enough for the attack to read wp-config.php and write to the files of all the others. This is why we sometimes clean a site and find it reinfected by a neighbor nobody remembered.
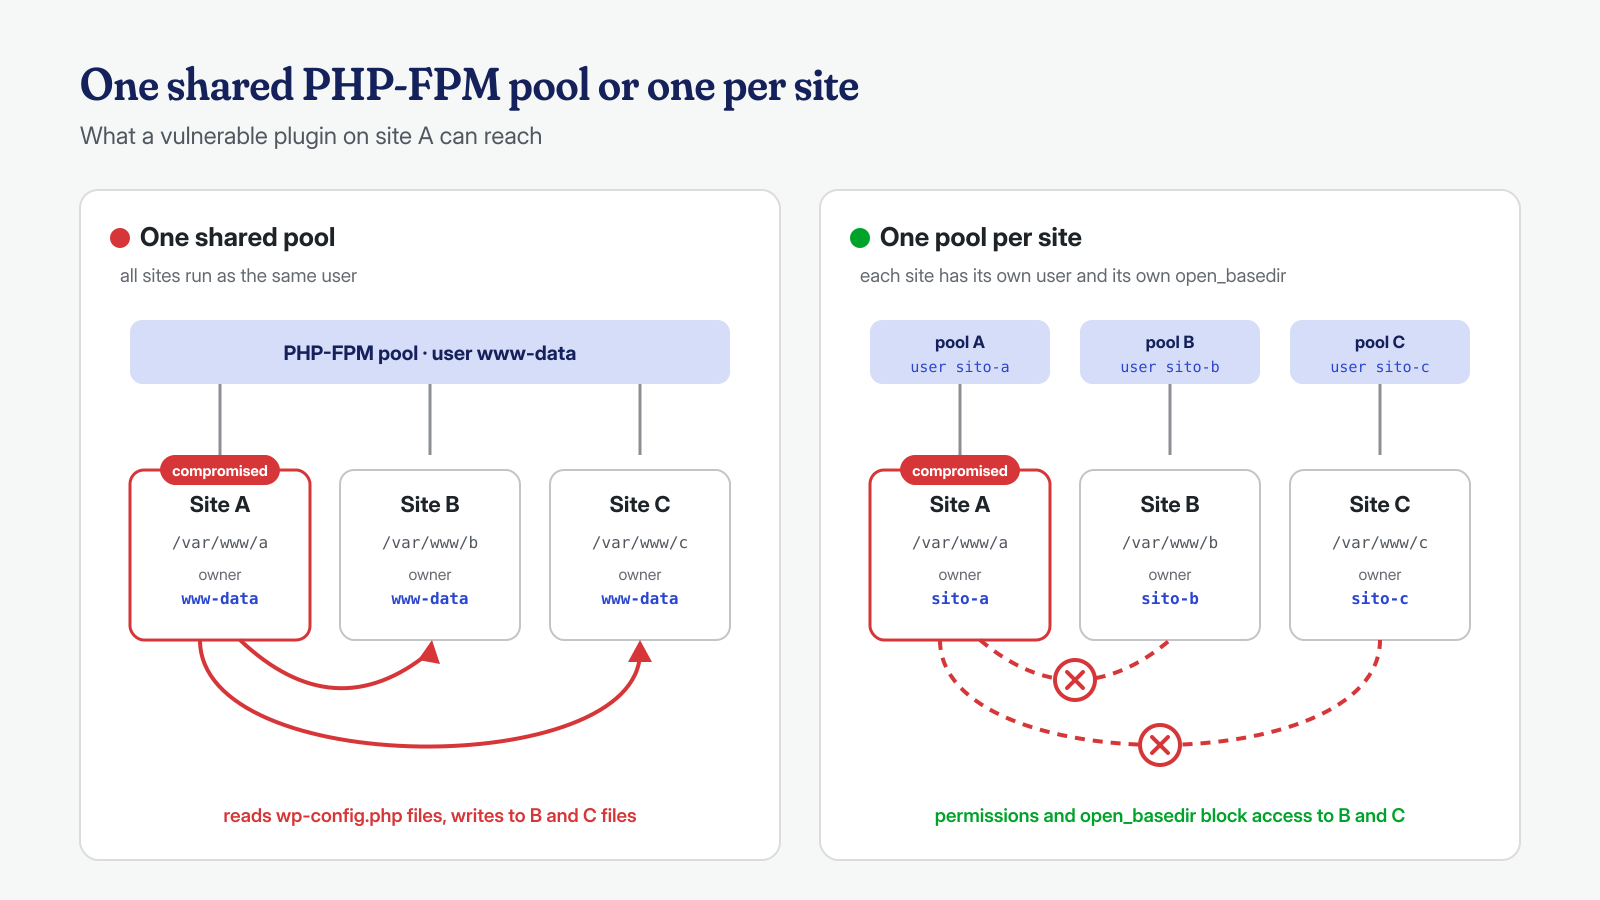
A per-site pool is defined in a dedicated file. The example below is for Debian and Ubuntu with PHP 8.3; on other distributions the paths change, not the directives.
; /etc/php/8.3/fpm/pool.d/esempio.it.conf
[esempio.it]
user = esempio
group = esempio
listen = /run/php/php8.3-fpm-esempio.it.sock
listen.owner = www-data
listen.group = www-data
listen.mode = 0660

pm = ondemand
pm.max_children = 10
pm.process_idle_timeout = 30s

php_admin_value[open_basedir] = /var/www/esempio.it/
php_admin_value[upload_tmp_dir] = /var/www/esempio.it/tmp
php_admin_value[sys_temp_dir] = /var/www/esempio.it/tmp
php_admin_value[session.save_path] = /var/www/esempio.it/sessions
php_admin_value[disable_functions] = exec,passthru,shell_exec,system,proc_open,popen
php_admin_flag[expose_php] = off
Values set with php_admin_value cannot be changed by the site’s code with ini_set(), nor by a .user.ini file. open_basedir limits the paths PHP can open to the site’s folder: that is why the temporary and session folders must also be moved inside it, otherwise uploads and logins stop working. After the change, check the configuration with php-fpm8.3 -t and reload the service.
Two warnings about disable_functions. The first: some functions are genuinely needed, for example by backup or image optimization plugins that launch external programs, so the list must be tested on the real site and not copied blindly. The second: it is not an impassable barrier. Over time various techniques to bypass it have been published, from combining putenv() and mail() with LD_PRELOAD to assorted interpreter bugs. It is an obstacle for automated attacks and the most common webshells, not containment. Real containment comes from the dedicated user and file system permissions.
Web server: xmlrpc, login and security headers
The xmlrpc.php file is a legacy WordPress interface, now replaced almost everywhere by the REST API. It remains a frequent target for brute-force login attempts, partly because the system.multicall method lets you try many passwords in a single request. If no service uses it, and you need to check because some plugins like Jetpack and some publishing apps need it, block it at the web server level:
# NGINX, in the server block
location = /xmlrpc.php {
    deny all;
    access_log off;
    log_not_found off;
}

# Apache 2.4
<Files "xmlrpc.php">
    Require all denied
</Files>
The login page should be protected with a rate limit. With NGINX this is done with the limit_req module: you define a zone that counts requests per IP address and apply it only to wp-login.php, so the rest of the site is unaffected.
# In the http block
limit_req_zone $binary_remote_addr zone=wplogin:10m rate=6r/m;

# In the server block, before the generic location for .php files
location = /wp-login.php {
    limit_req zone=wplogin burst=5 nodelay;
    limit_req_status 429;
    include snippets/fastcgi-php.conf;
    fastcgi_pass unix:/run/php/php8.3-fpm-esempio.it.sock;
}
To block the most persistent addresses, add fail2ban, which reads the logs and bans them at the firewall level. A failed login on wp-login.php answers with a 200 status (the page is shown again with the error), while a successful one answers with a 302 redirect: the filter therefore counts POST requests that ended with a 200 or with the 429 of the rate limit just configured.
# /etc/fail2ban/filter.d/wordpress-login.conf
[Definition]
failregex = ^<HOST> .* "POST /(wp-login|xmlrpc)\.php HTTP/[0-9.]+" (200|429)
ignoreregex =

# /etc/fail2ban/jail.d/wordpress-login.conf
[wordpress-login]
enabled  = true
port     = http,https
filter   = wordpress-login
logpath  = /var/log/nginx/access.log
maxretry = 10
findtime = 10m
bantime  = 1h
The filter assumes the default log format, with the client address at the start of the line; if the site is behind a CDN or a proxy, you first need to make the web server log the visitor’s real IP, otherwise fail2ban will ban the proxy.
Security headers, finally, do not stop a server-side infection, but they reduce the impact of some attacks in visitors’ browsers, such as clickjacking or the interpretation of an uploaded file as a script. They are just a few lines:
server_tokens off;
add_header Strict-Transport-Security "max-age=31536000; includeSubDomains" always;
add_header X-Content-Type-Options "nosniff" always;
add_header X-Frame-Options "SAMEORIGIN" always;
add_header Referrer-Policy "strict-origin-when-cross-origin" always;
add_header Permissions-Policy "camera=(), microphone=(), geolocation=()" always;
Watch out for one NGINX detail: if a location defines even a single add_header directive, it does not inherit those from the server block. It is therefore worth checking the result with curl -sI https://esempio.it/ on several types of page. A Content Security Policy is the most effective measure against JavaScript skimmers, but on WordPress it has to be built patiently: start with Content-Security-Policy-Report-Only, collect the violations and only then make it active.
Off-server backups and monitoring
A backup that sits on the same server as the site, written by the same user, can be deleted or infected by the same attack. Backups that are useful after an incident have three characteristics: they are stored elsewhere, whoever creates them cannot delete them, and several versions exist, so you can go back to before the infection. The most robust model is the one where the backup server pulls the data from the site, rather than the site pushing it: this way the credentials to delete backups are never on the exposed machine.
# Consistent database dump without locking InnoDB tables
mysqldump --single-transaction --routines --triggers \
  -u backup -p nome_database | gzip > /var/backups/esempio.it/db-$(date +%F).sql.gz
The --routines and --triggers options are not a detail: they include in the dump the code that lives in the database, which is exactly what you need to spot a malicious trigger by comparing two backups.
Monitoring closes the loop. The goal is not to prevent everything, but to notice within hours, not weeks, if something changes. The simplest check is to compare core and plugin files with the official versions:
# Core files that differ from the original or were added
wp core verify-checksums

# Plugins from the official directory (commercial ones are skipped)
wp plugin verify-checksums --all

# PHP files modified in the last 24 hours
find /var/www/esempio.it/htdocs -name '*.php' -mtime -1 -ls
Run every day by a system cron job, with the output emailed only when it is not empty, these commands flag most reinfections. At the system level you add an integrity tool such as AIDE, which keeps a fingerprint of the files and alerts you when they change, and a periodic check of crontab, administrator users and the mu-plugins folder. Logs should also be kept and read: an unusual request to a plugin file is often the first sign of an attempt, and today they can be analyzed much more effectively with AI models run locally.
The checklist at a glance
Not all items have the same urgency. Some must be done right away, before putting the site back into production; others require changes to the server configuration and need to be planned; still others are habits to maintain over time.
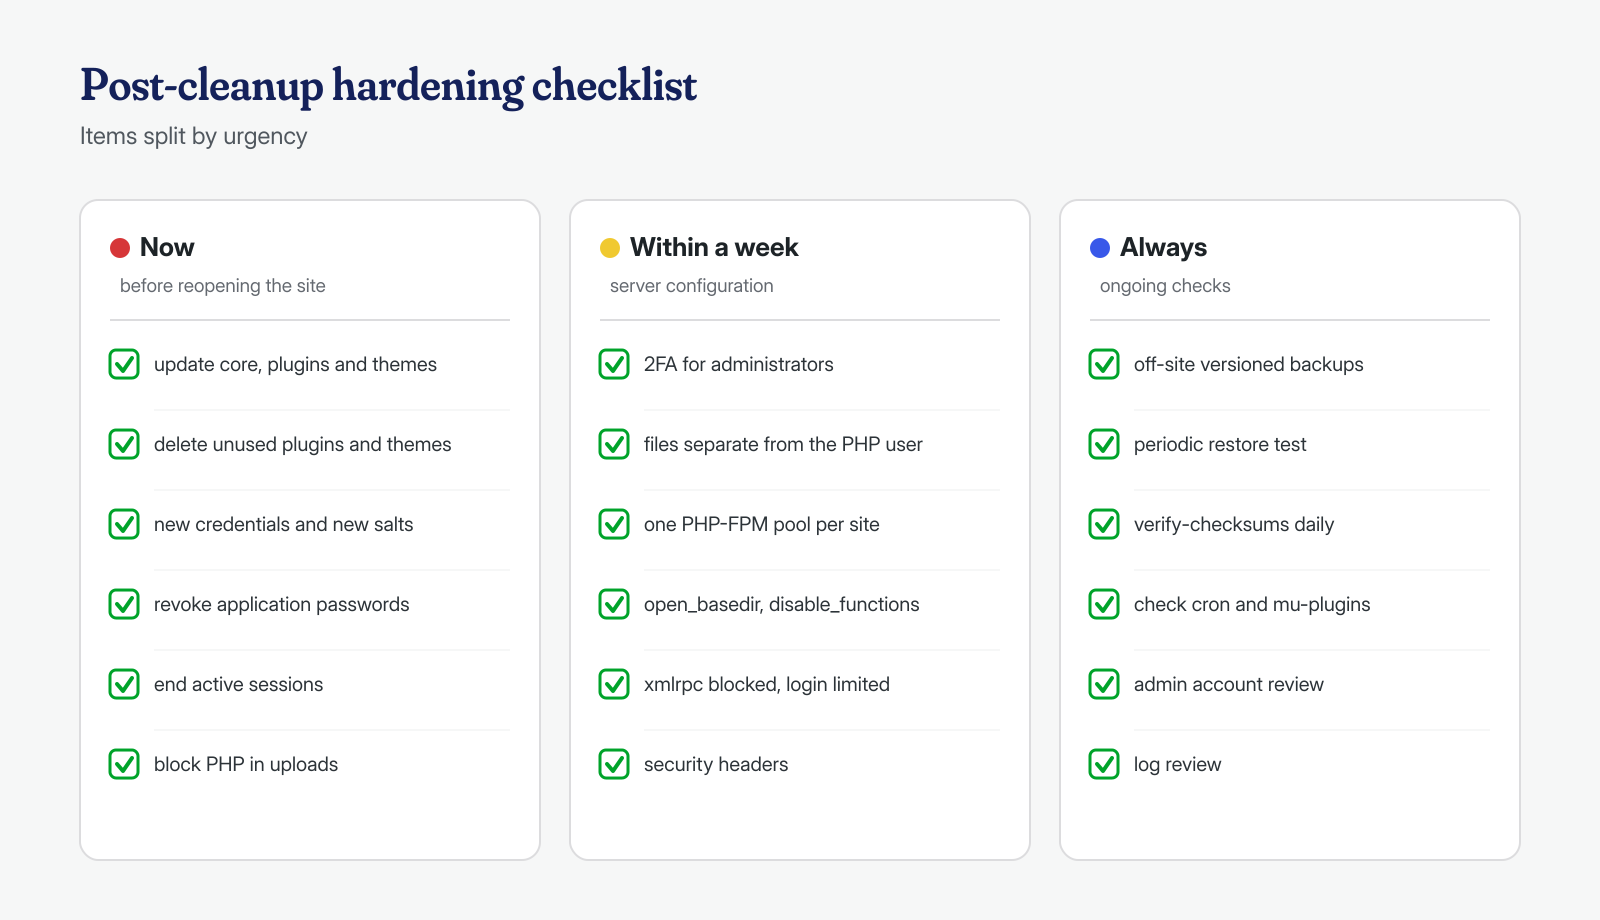
- Right away: update core, plugins and themes; delete unused or abandoned ones; change all credentials, regenerate the salts, revoke application passwords and sessions; block PHP execution in uploads.
- Within the week: enable 2FA for administrators; separate the file owner from the PHP user; create a PHP-FPM pool for each site, with
open_basedirand adisable_functionslist tested on the site; blockxmlrpc.phpif it is not needed; rate-limit logins; add security headers. - Always: off-site, versioned backups that the site cannot delete, with periodic restore tests; daily verification of checksums and modified files; checks of cron, users and
mu-plugins; log retention and review.
If the site had ended up on a blacklist, hardening is also the prerequisite for requesting a review: Google and the other services want to see that the problem has been solved, not just cleaned up. How to proceed is explained in the guide to blacklist removal with Search Console.
Many measures can be applied on your own; those at the system level, such as separate pools and file ownership, require root access and some testing so as not to interrupt the site. When we are entrusted with a cleanup, with guaranteed turnaround in 6, 12 or 24 hours per WordPress installation, we always close the gap the attack came in through and point out which items on this list are missing; if you would like an opinion on your case, you can write to us.
